
Guide to Muse
This guide will help you get started with Muse and make the most of it. We’re always available to help at hello@museapp.com if your question isn’t answered here.
Quick Start
New to Muse? Master these six interactions first, then explore the power features below.
6 Essential Interactions
-
Create a board
Tap the board icon in the toolbar or press B. On iPad, you can also drag in from the left screen edge. (This gesture doesn't work when the sidebar is open.)
-
Add content
Double-tap (iPad) or double-click (Mac) anywhere to create a text block. Use the toolbar to add images, PDFs, notes, and other card types.
-
Switch tools with quasimodes (iPad + Pencil)
While drawing, hold fingers on the screen with your non-drawing hand to temporarily switch tools:
- Hold 1 finger → first toolkit slot (default: eraser)
- Hold 2 fingers → second toolkit slot (default: selection)
- Hold 3 fingers → third toolkit slot
Release to return to your current tool. Customize which tools appear in each slot via Settings. If you're left-handed, check the handedness setting so finger detection works correctly.
-
Navigate boards
Tap (iPad) or double-click (Mac) a board card to enter it. Press Escape or use the breadcrumb navigation bar to exit. Pinch to zoom; two-finger drag to pan.
-
Undo/Redo
Two-finger tap to undo, three-finger tap to redo. On Mac, use ⌘Z / ⌘⇧Z.
-
Select multiple cards
On iPad with Pencil, hold 2 fingers on the screen while drawing a lasso around cards to activate the selection tool via quasimode. On Mac, hold Option and drag to draw a freeform lasso selection around multiple cards.
3 Power Features
Right-click (Mac) or use the card menu (iPad) to color cards for visual organization.
Draw lines between cards to show relationships. Select a card and press ⌘⇧C, then click the target card.
Create a reference to the same card in multiple places — edit one and all copies update automatically. Right-click → Add Linked Card.
Finding Help
- This guide — Detailed sections on every feature below
- Email support — hello@museapp.com
- Community Discord — museapp.com/community for tips and workflows
- In-app feedback — Sidebar → Feedback to message the team directly
Intro to the interface
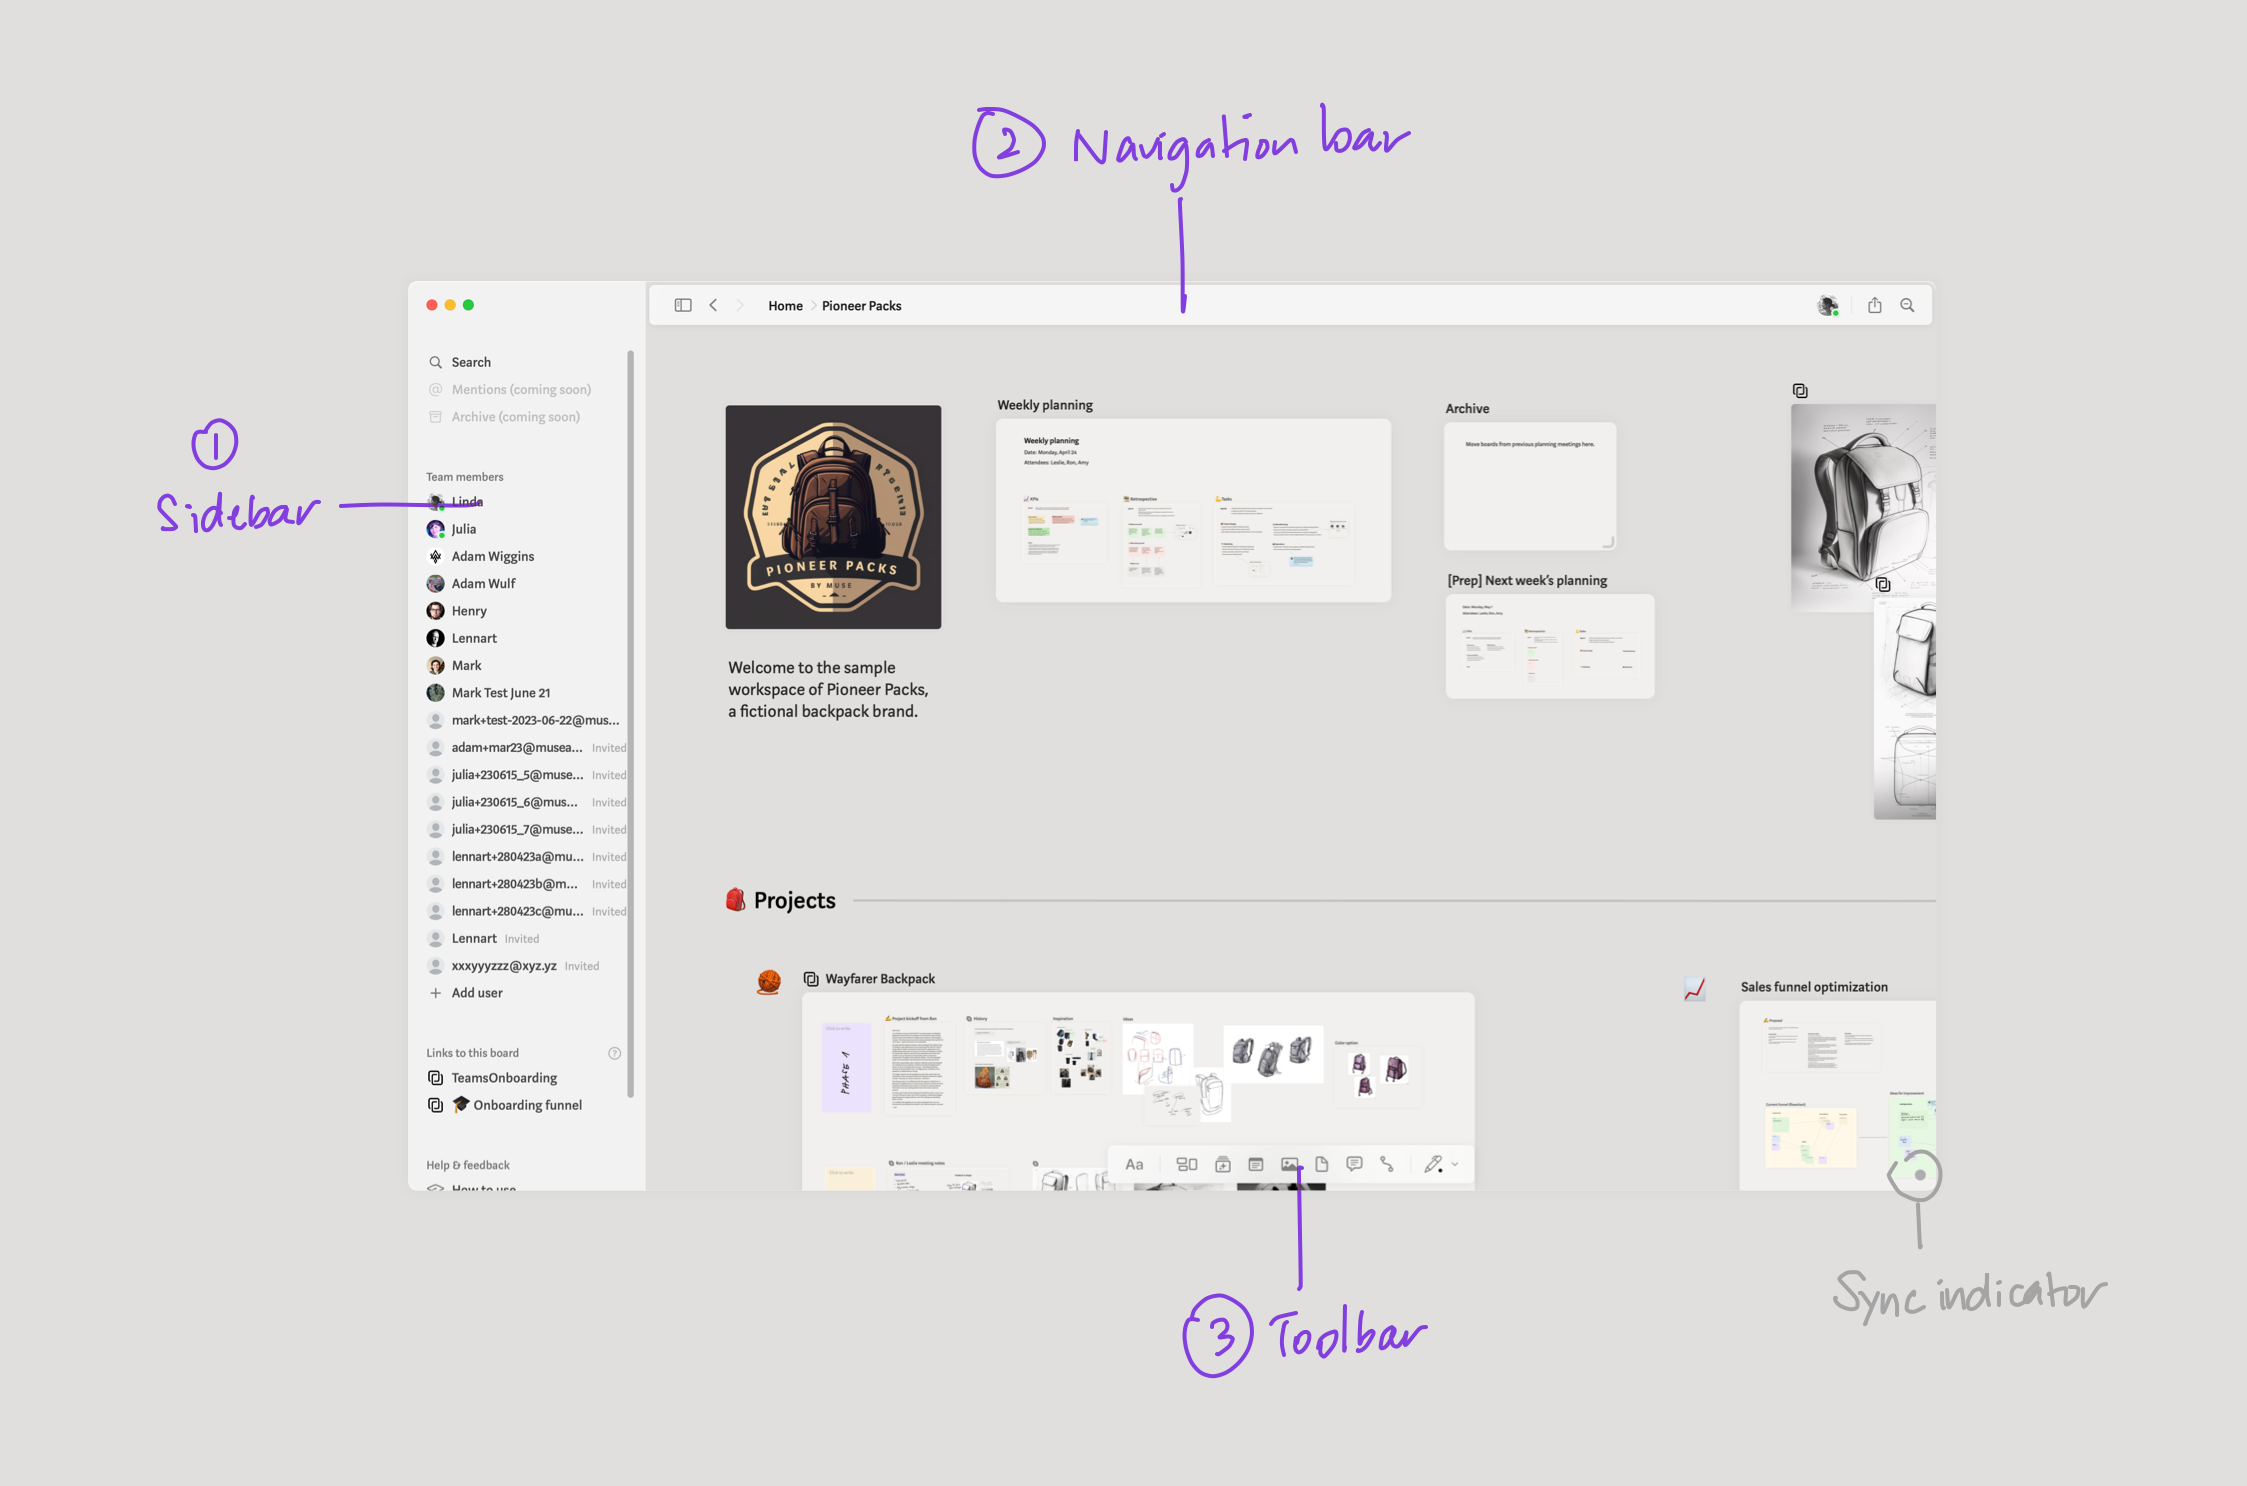
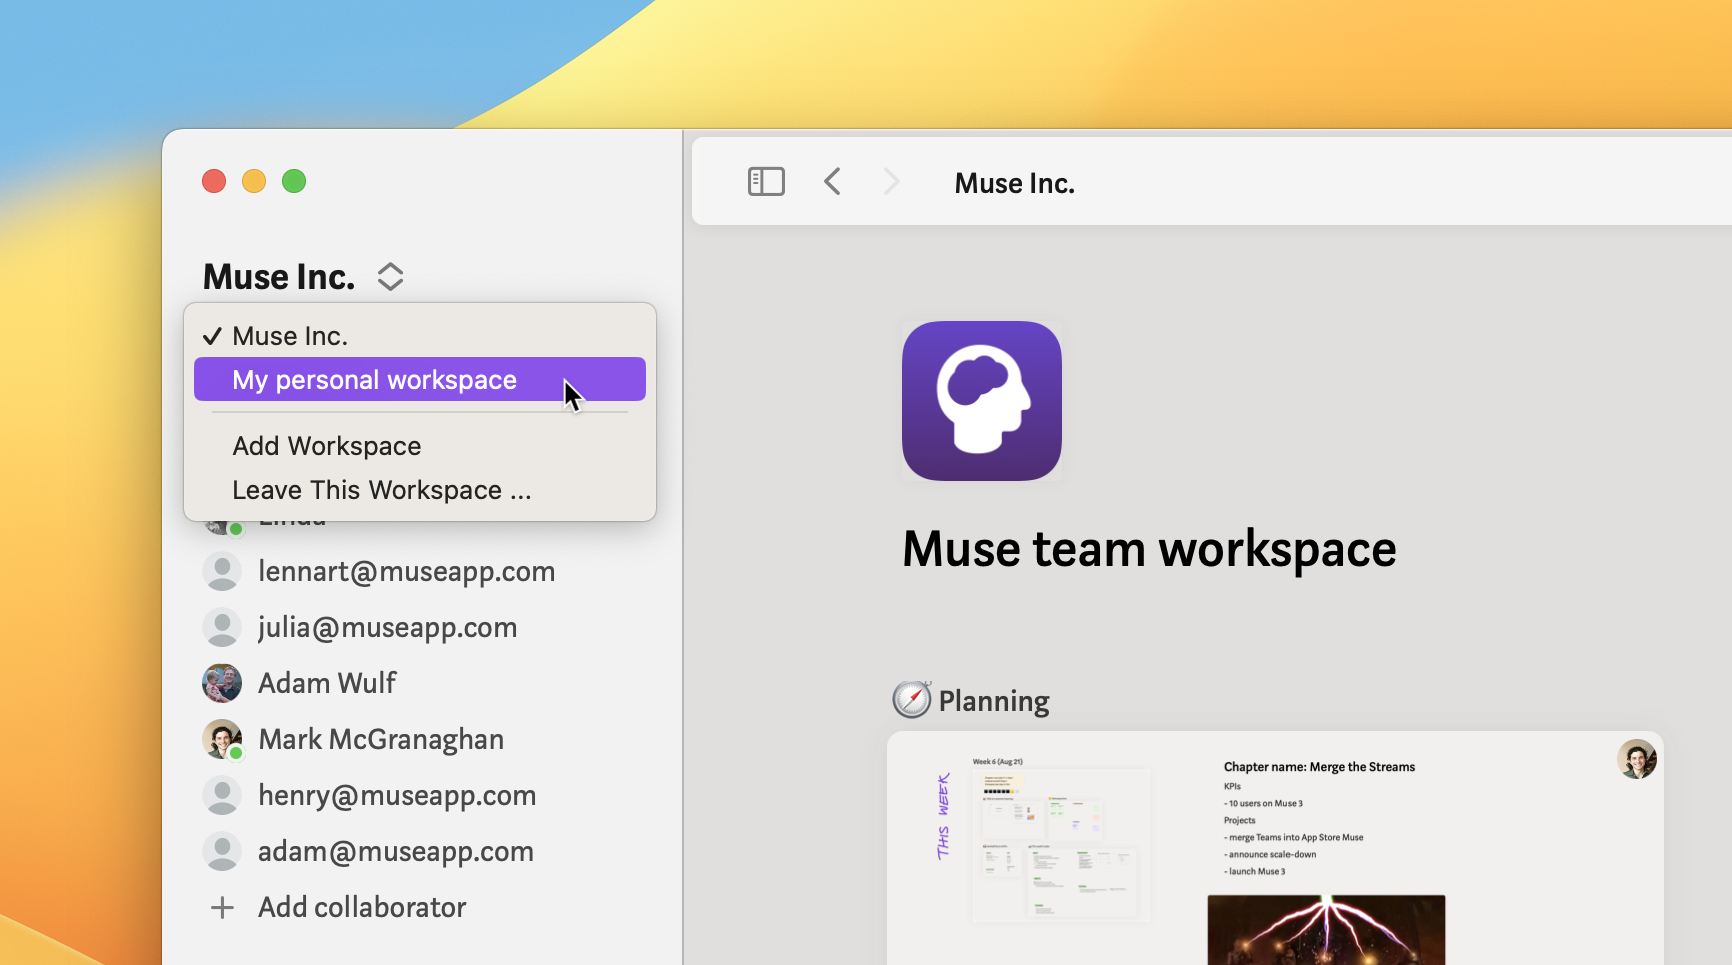
1 — Sidebar
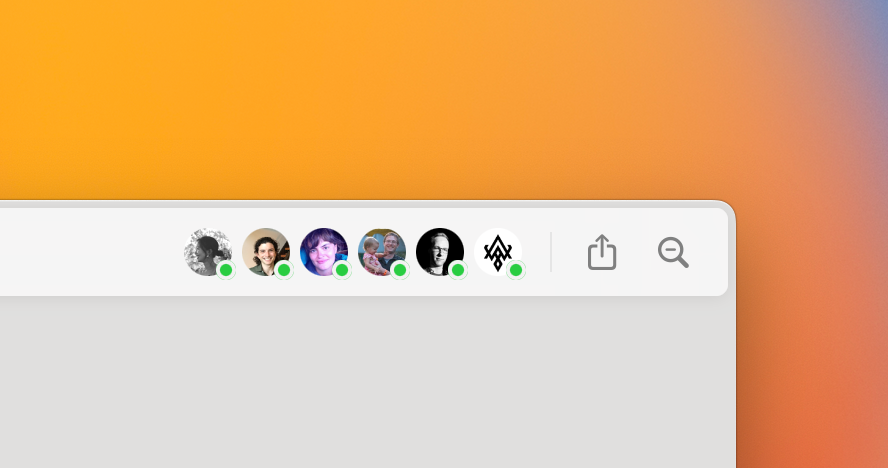
Think of the sidebar as the main control panel for your workspace(s). You can switch workspaces from here, access search, see who’s online in a shared workspace, and see a list of where you’ve linked the board you’re in.
You can show or hide it using the keyboard shortcut ⌘ + Option + S or the icon on the left in the top navigation bar.
Shared workspaces
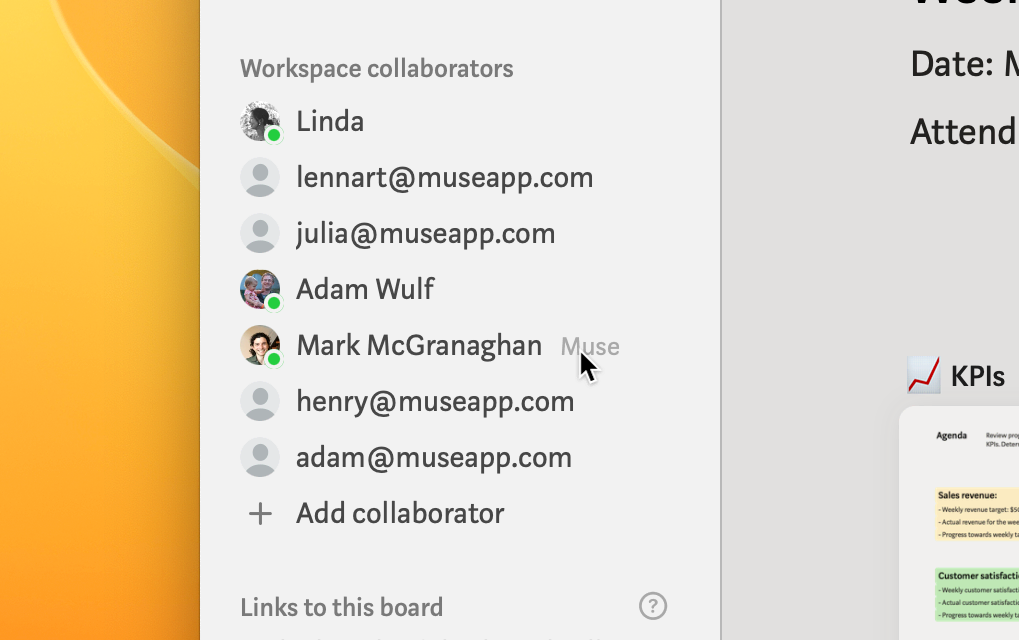
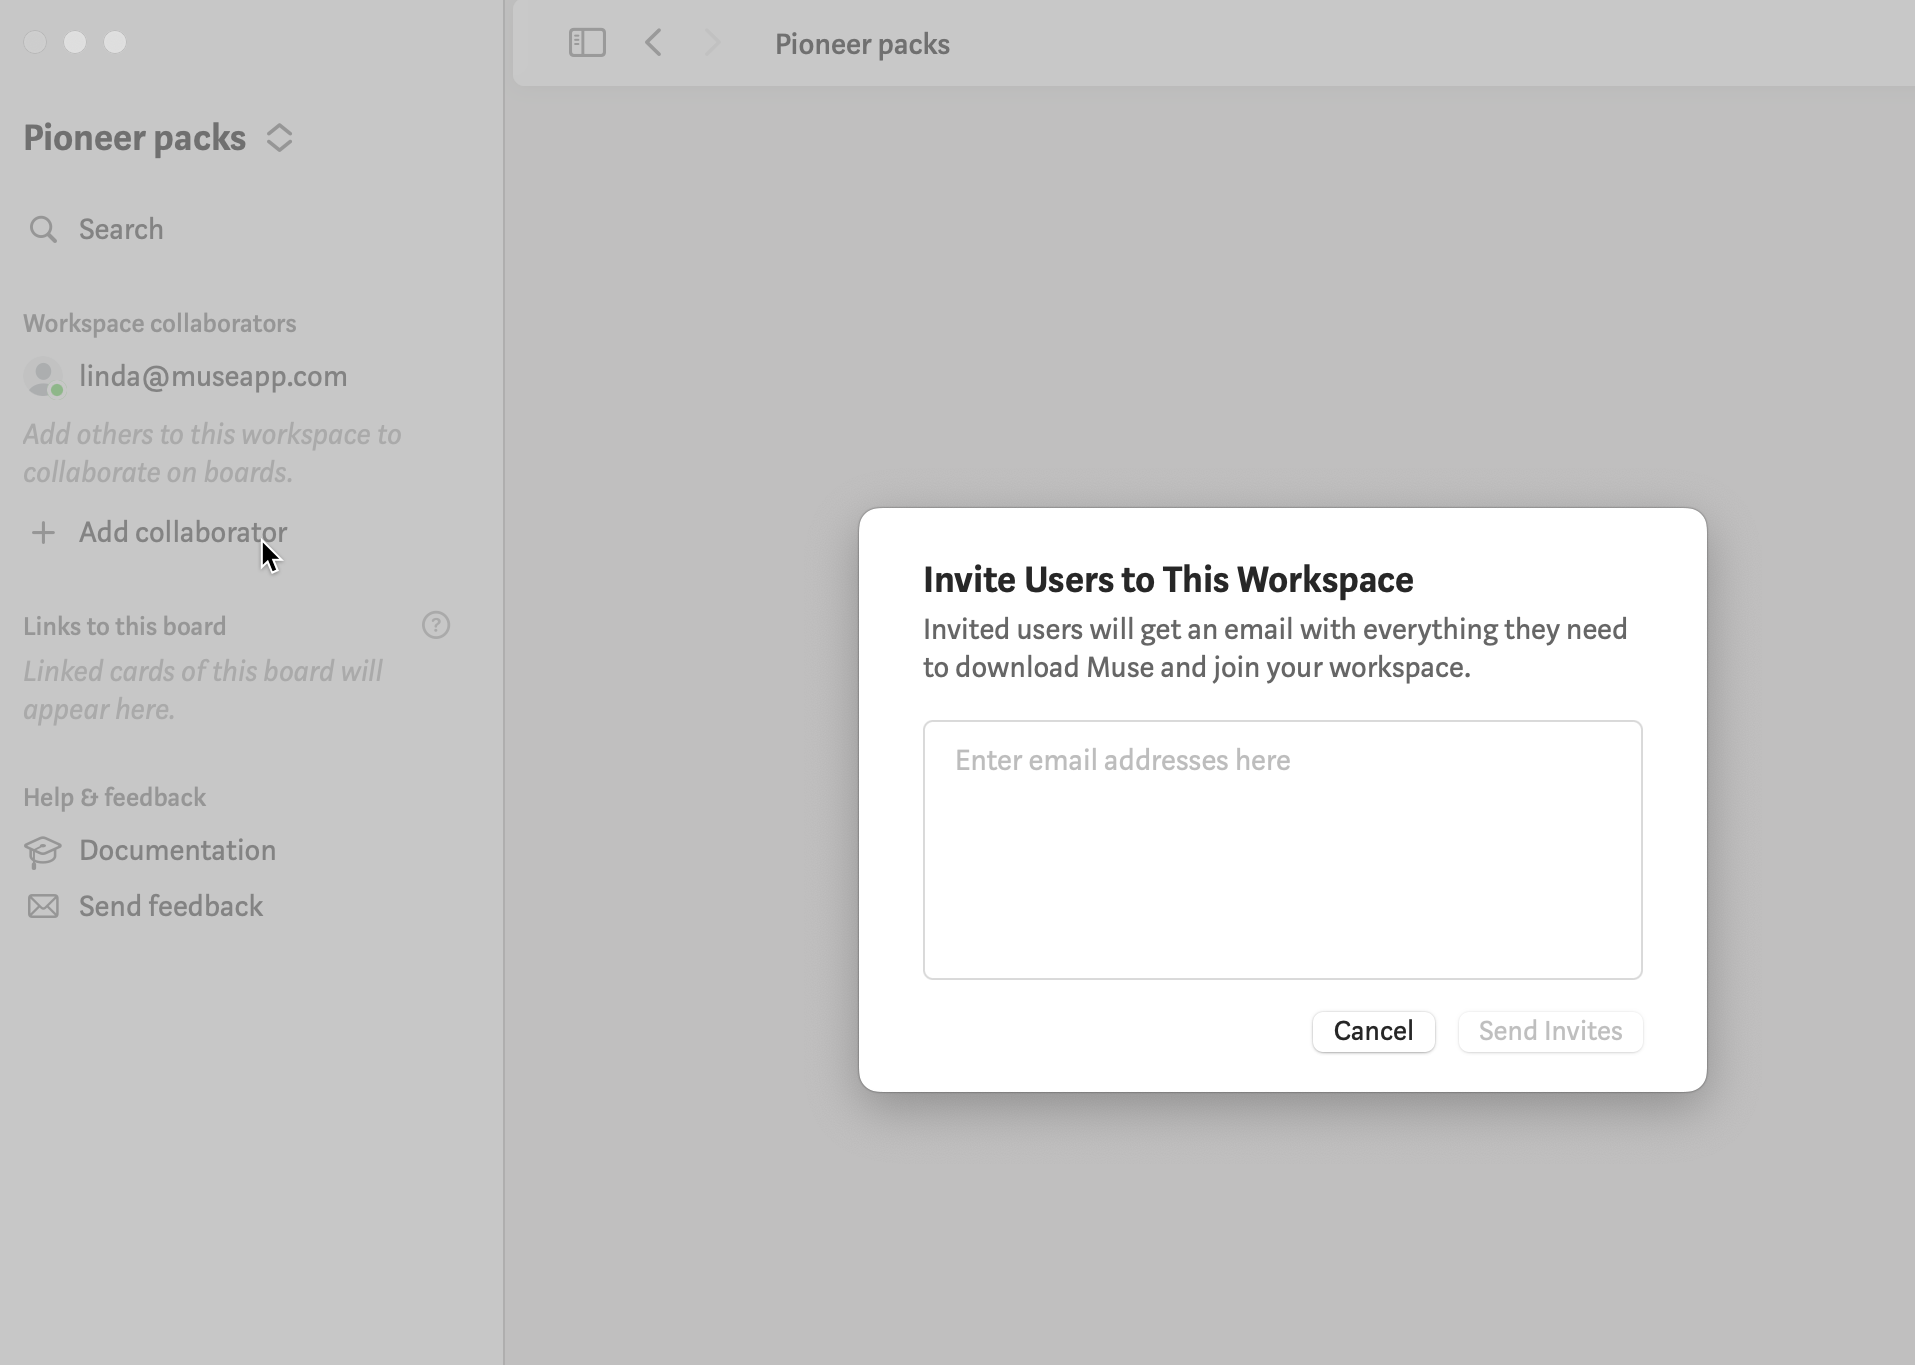
If you’re in a shared workspace, under Workspace collaborators you can:
- See who’s online
- See which board the online collaborators are in (hover over their name)
- See who’s been invited
- Add more collaborators
In a remote setting it’s nice to have an ambient awareness of what your team is up to — it makes working in different locations a little less detached.
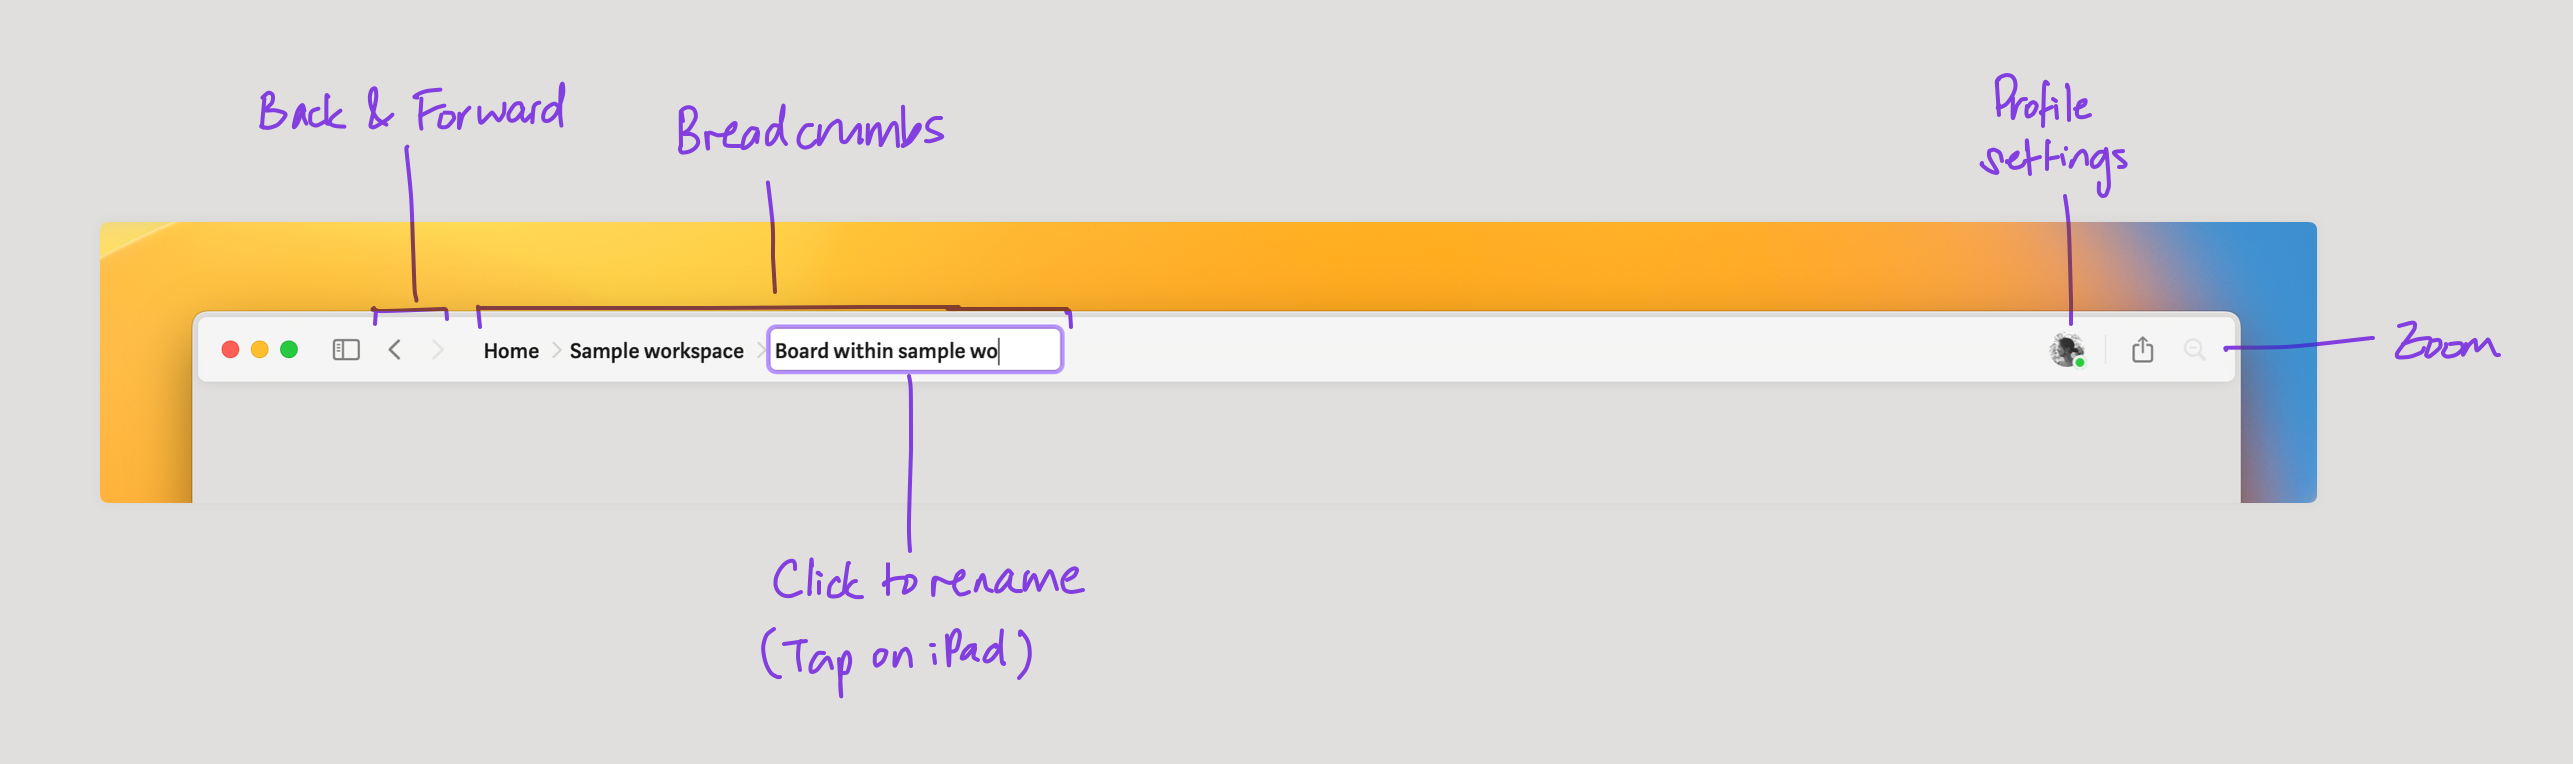
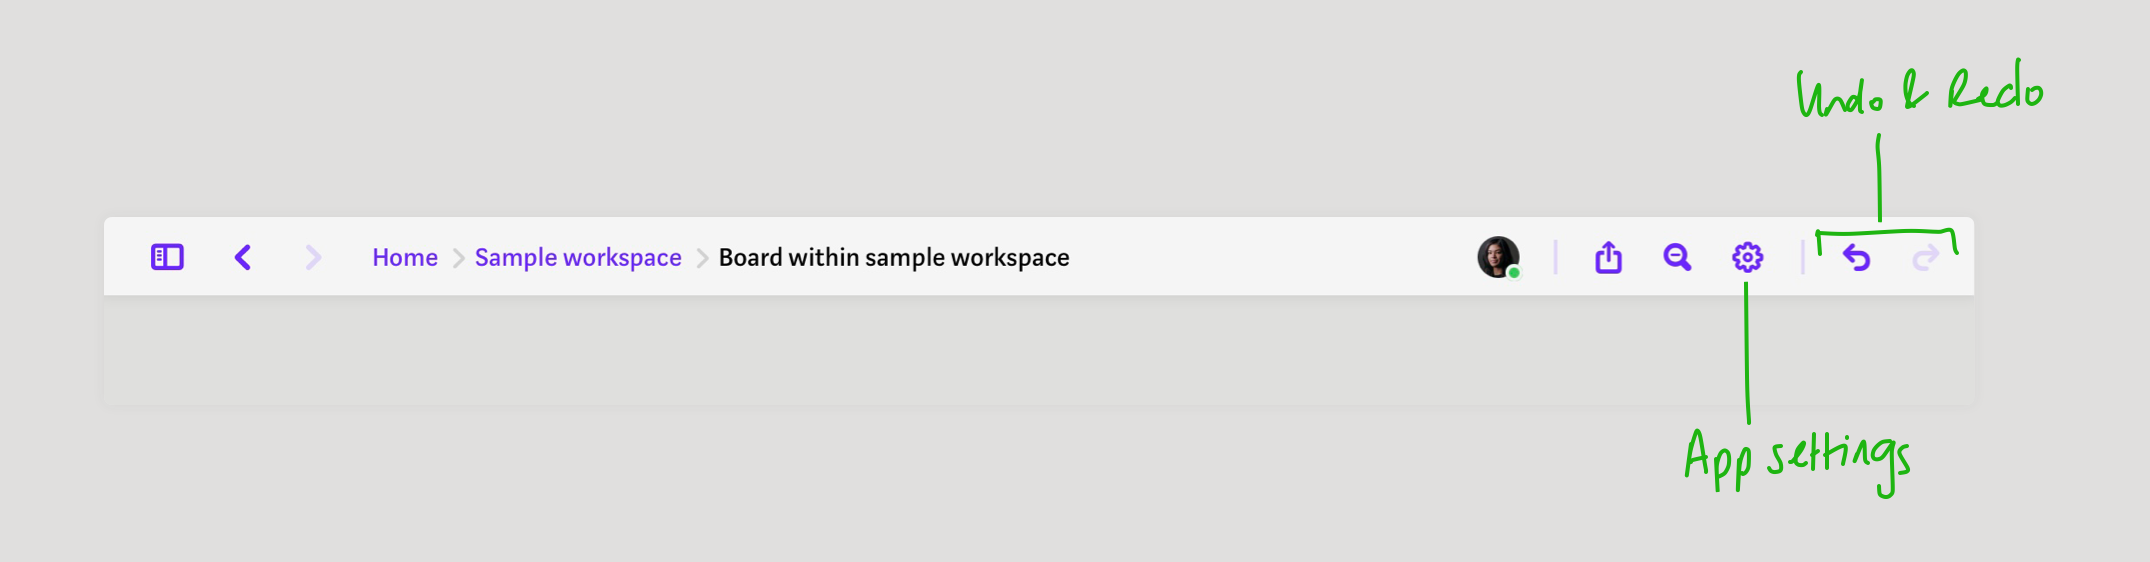
2 — Navigation bar
Use the back and forward arrows to move between the current board and boards you were in before.
When you’re down a rabbit hole of deeply nested boards, use the breadcrumbs to move up the hierarchy. You can also rename your boards by clicking or tapping on the name.
Access your Profile settings, share your current board, and toggle the zoom level.
On iPad, you can also open app settings and undo / redo actions from the navigation bar. Additionally, you can tap anywhere with two / three fingers to undo / redo.
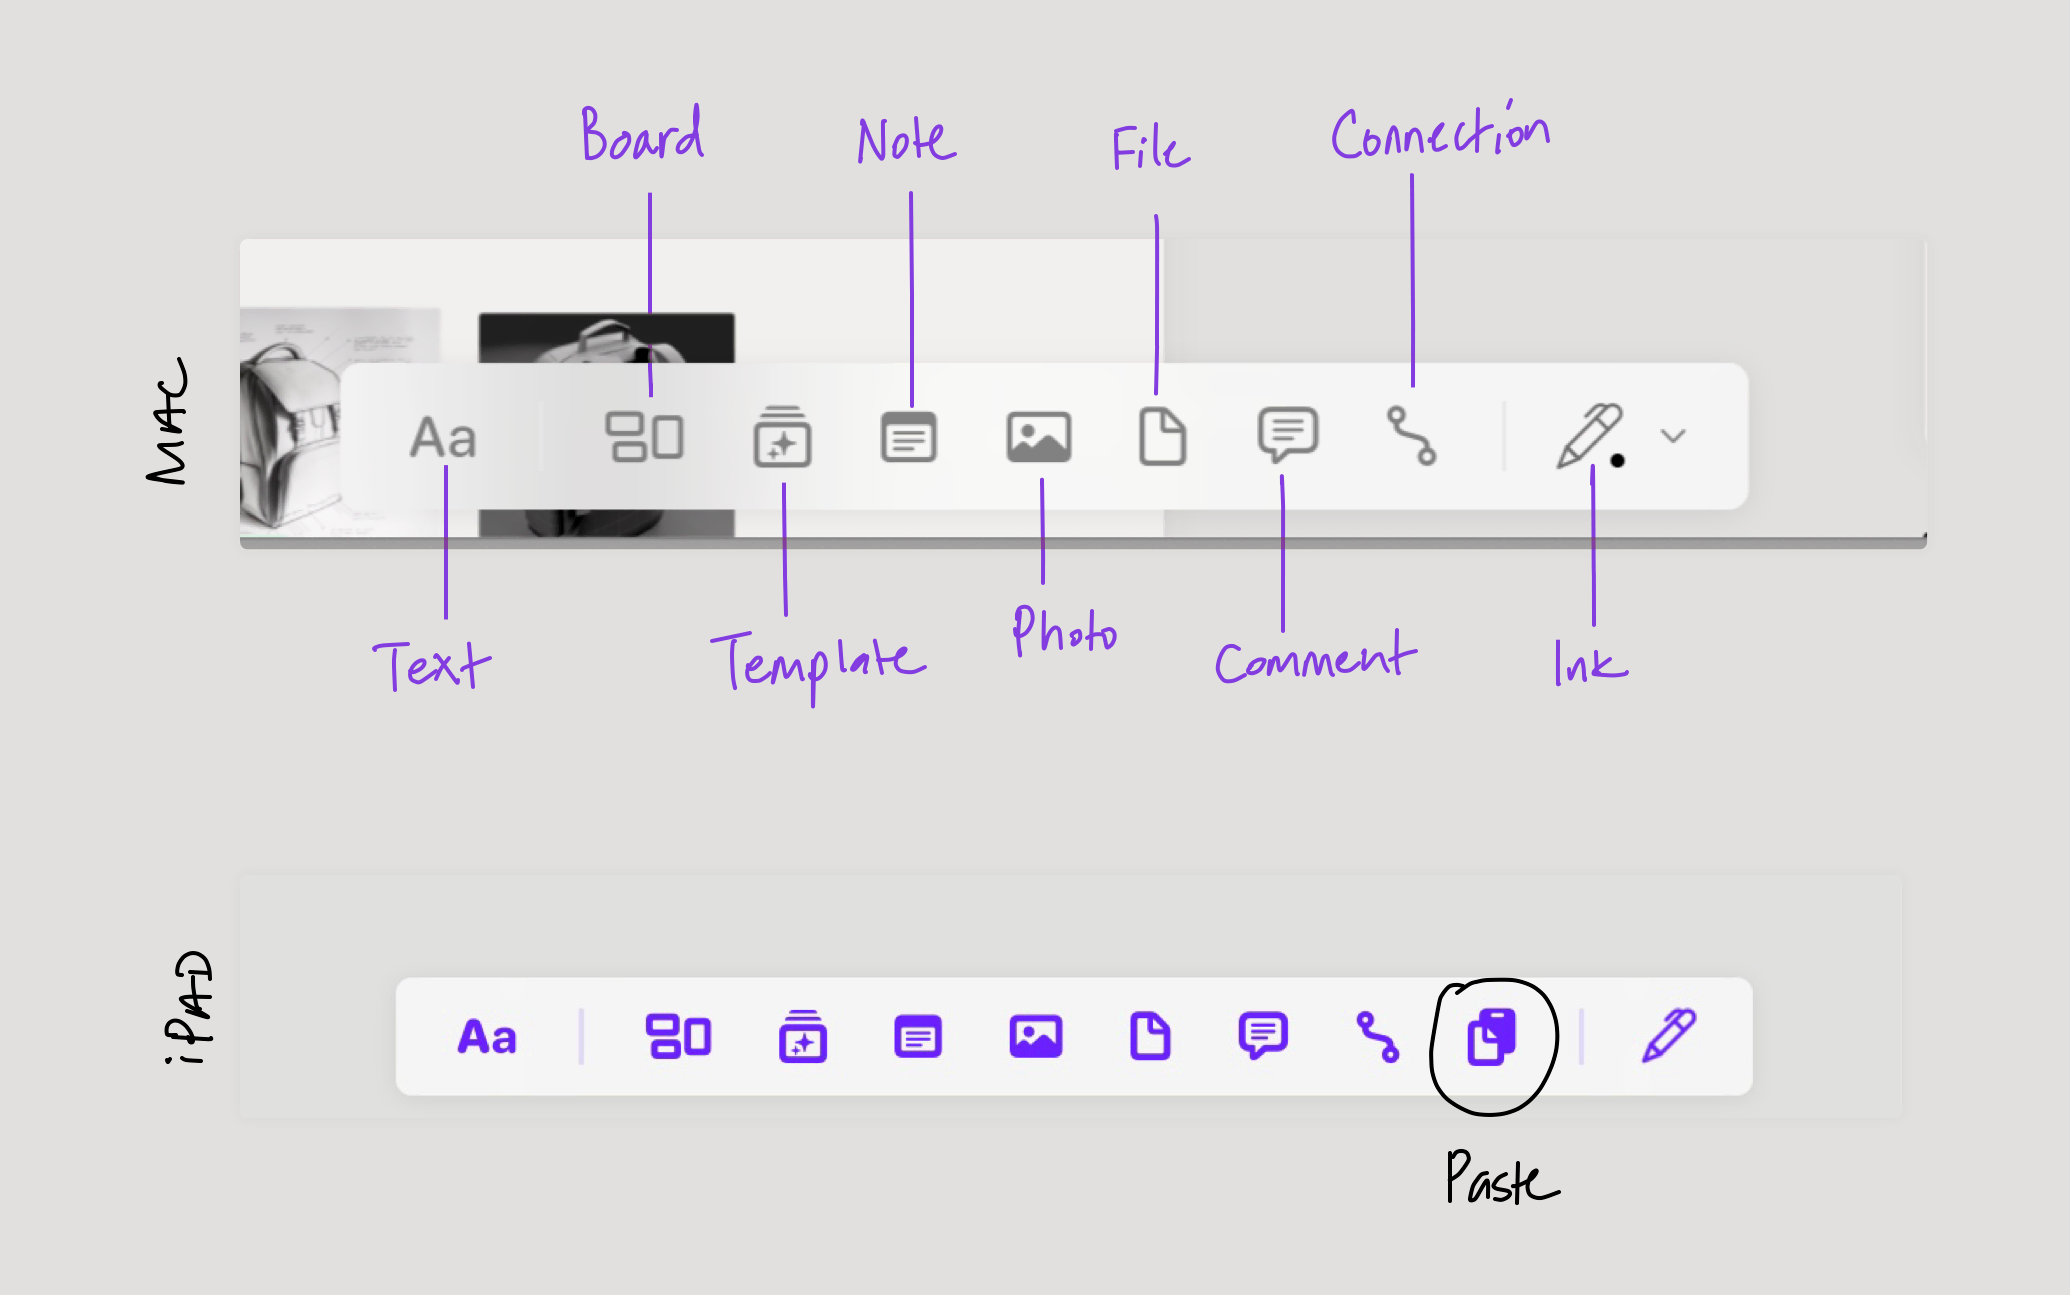
3 — Toolbar
You can add text, boards, ink, and other media using the toolbar at the bottom (more on rich media cards). In the toolbar on iPad, you get an extra icon for pasting things.
Inbox
The inbox travels with you, like a visual copy-paste buffer. Stash cards onto the inbox stack on the left anytime. It’s where new cards you add from outside of Muse appear, ready to be placed where you want them.
The inbox appears on the left whenever you try to move a card.
Using the inbox on iPad
Nested Boards
Boards are made to be nested within each other. Think of them as separate spaces in your workspace that work similarly to folders on your Mac. There’s no limit to how many boards within boards you can create. Boards are anchored to the upper-left and expand to the lower-right as you add content.
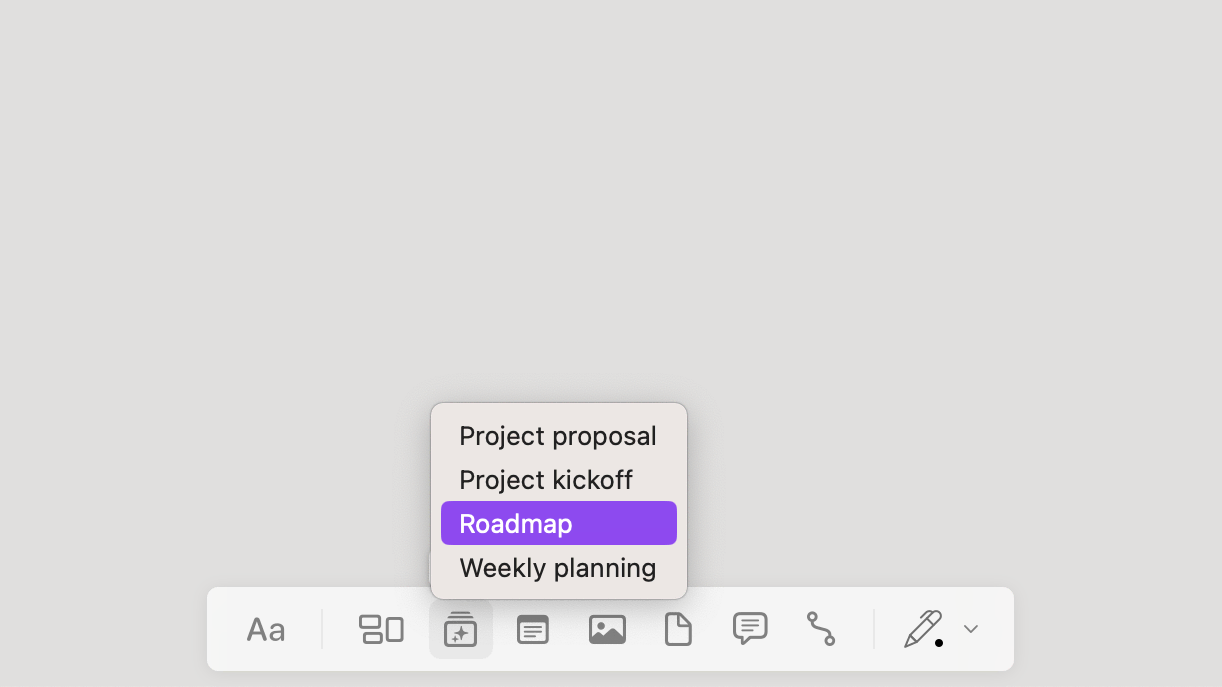
Creating boards
You can start with a blank board or start with a template.
To start with a blank board, use the board icon in the bottom toolbar or use the keyboard shortcut B.
Tip for Mac users: When clicking on the canvas to add the board, try resizing it by click and dragging on the bottom right corner immediately.
On iPad, you can also create a new board by dragging in from the left edge. (This doesn’t work if you have Stage Manager enabled or if the sidebar is open.)
Adding a board on Mac
To create a board from a template, use the template icon.
Navigating boards
To open a board, double-click or tap once. To exit, press ESC or use the breadcrumbs to navigate one level up.
Ways to pan around in a board on Mac:
- Two-finger scroll with trackpad
- Scroll with mouse, and hold Shift to scroll horizontally
- Space bar + drag
On iPad, we recommend panning using two fingers to avoid accidentally moving things.
Panning and board zoom on Mac
When you tap into a board card, you zoom directly to the place in the board where you tapped. This makes navigating into very large boards much quicker, as you can jump directly to where you’d like instead of having to scroll each time you navigate.
Board zoom lets you pinch to work at any scale, with fast switching between fully zoomed in and fit-to-window.
Ways to zoom:
- Pinch in / out
- Hold ⌘ while scrolling with your mouse or trackpad
- Press ⌘ and [+] (zoom in) or [-] (zoom out)
- Click the zoom button in the navigation bar to toggle between fit-to-window and 100%
Move to new board
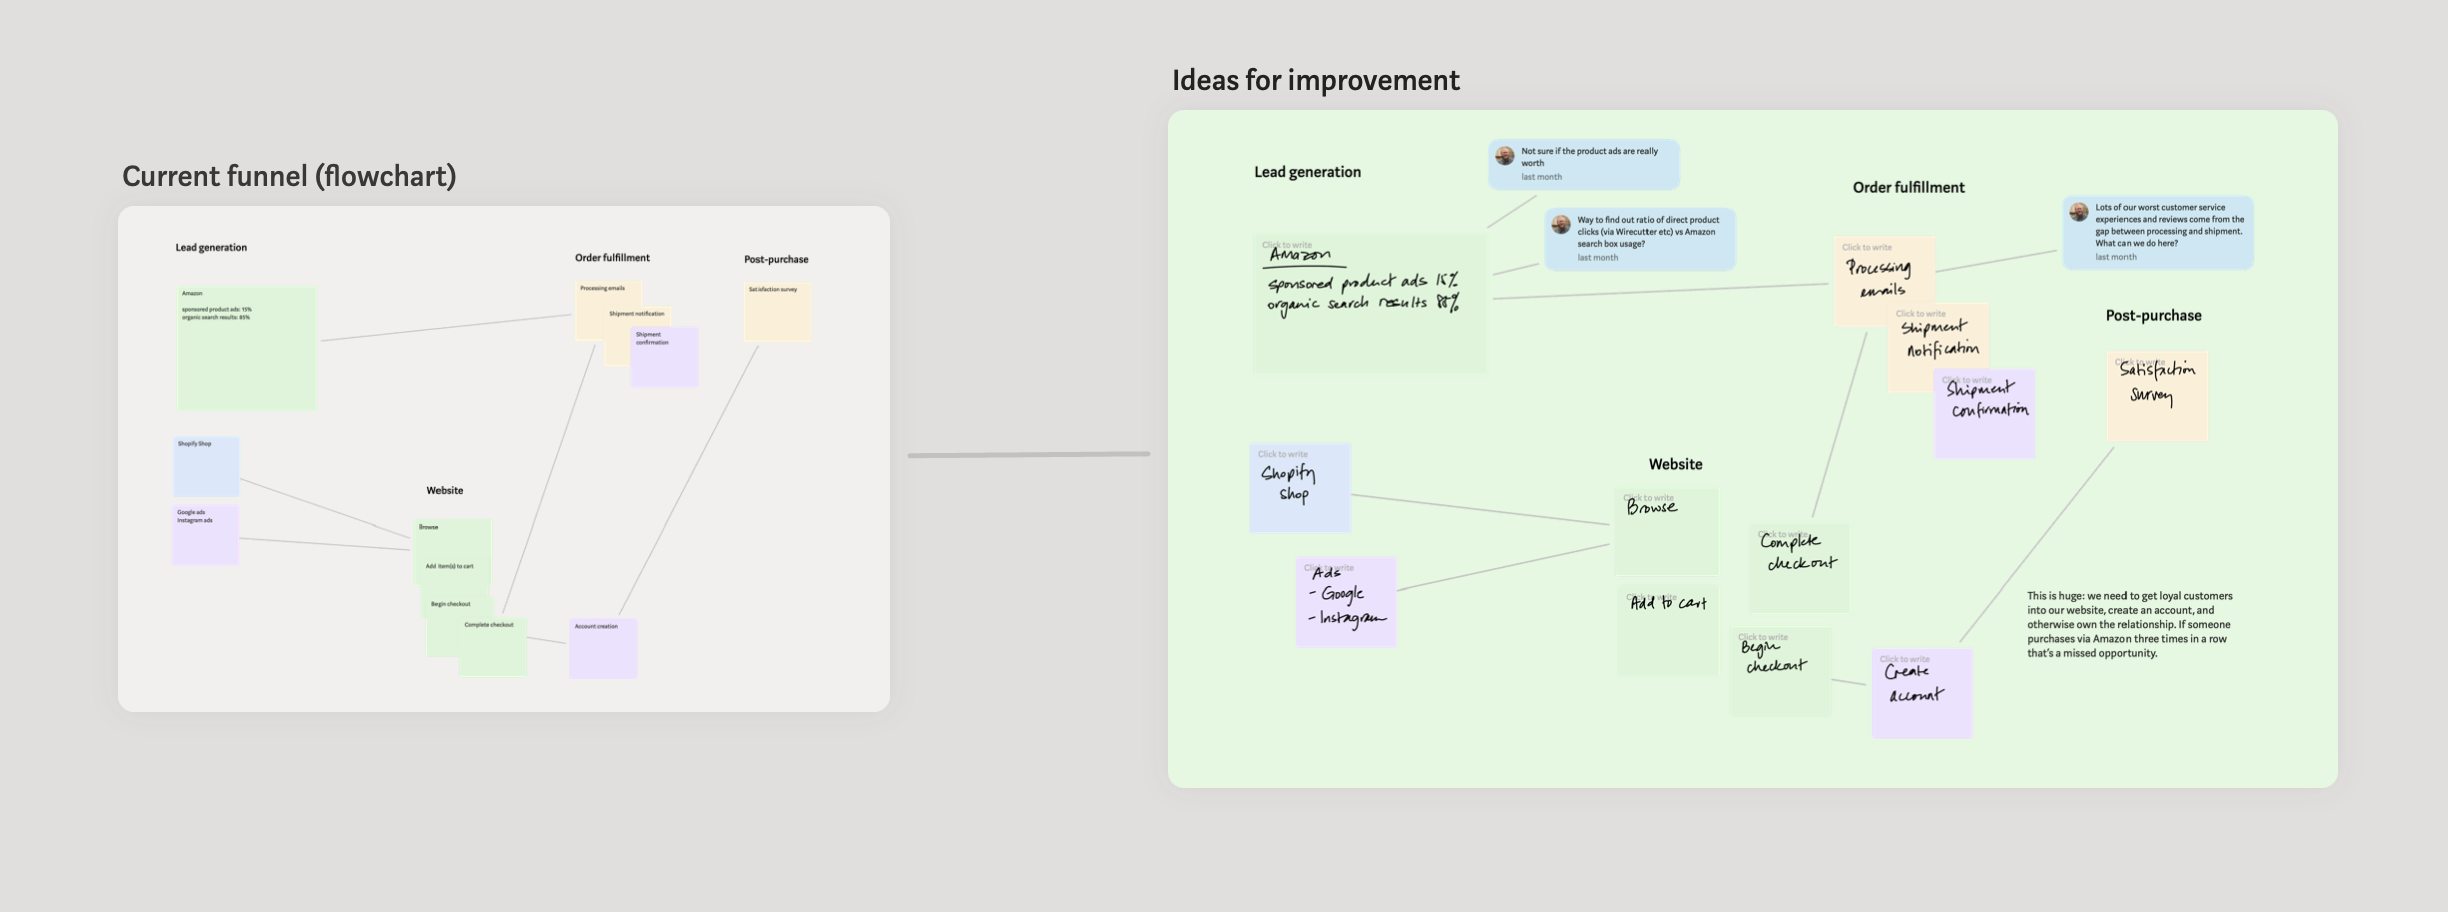
Sometimes it makes sense to start thinking by laying everything flat on a single canvas. But then you might reach a point where the board becomes too big, and you want to divide the content into sections. When this happens, you can easily move a selection of content into a new board.
On Mac, select the content you want to move, then right-click → Move to new board. Keyboard shortcut: Shift + ⌘ + B.
On iPad, select the content you want to move. Then, tap on the selection to open the selection menu and select Move to new board.
Move to new board on Mac
Content & cards
Text & ink
Text blocks are the primary text type in Muse. They can be rearranged by dragging, turned into headings, and colored. Double-click or double-tap anywhere on the canvas to start writing or use the text icon in the toolbar. Keyboard shortcut: T. Move the whole chain of text by holding the Shift key and click+drag.
Reordering and moving text blocks on Mac
Ink anywhere on the canvas or on cards. Inking works best on iPad using the Pencil, but it’s also supported on Mac.
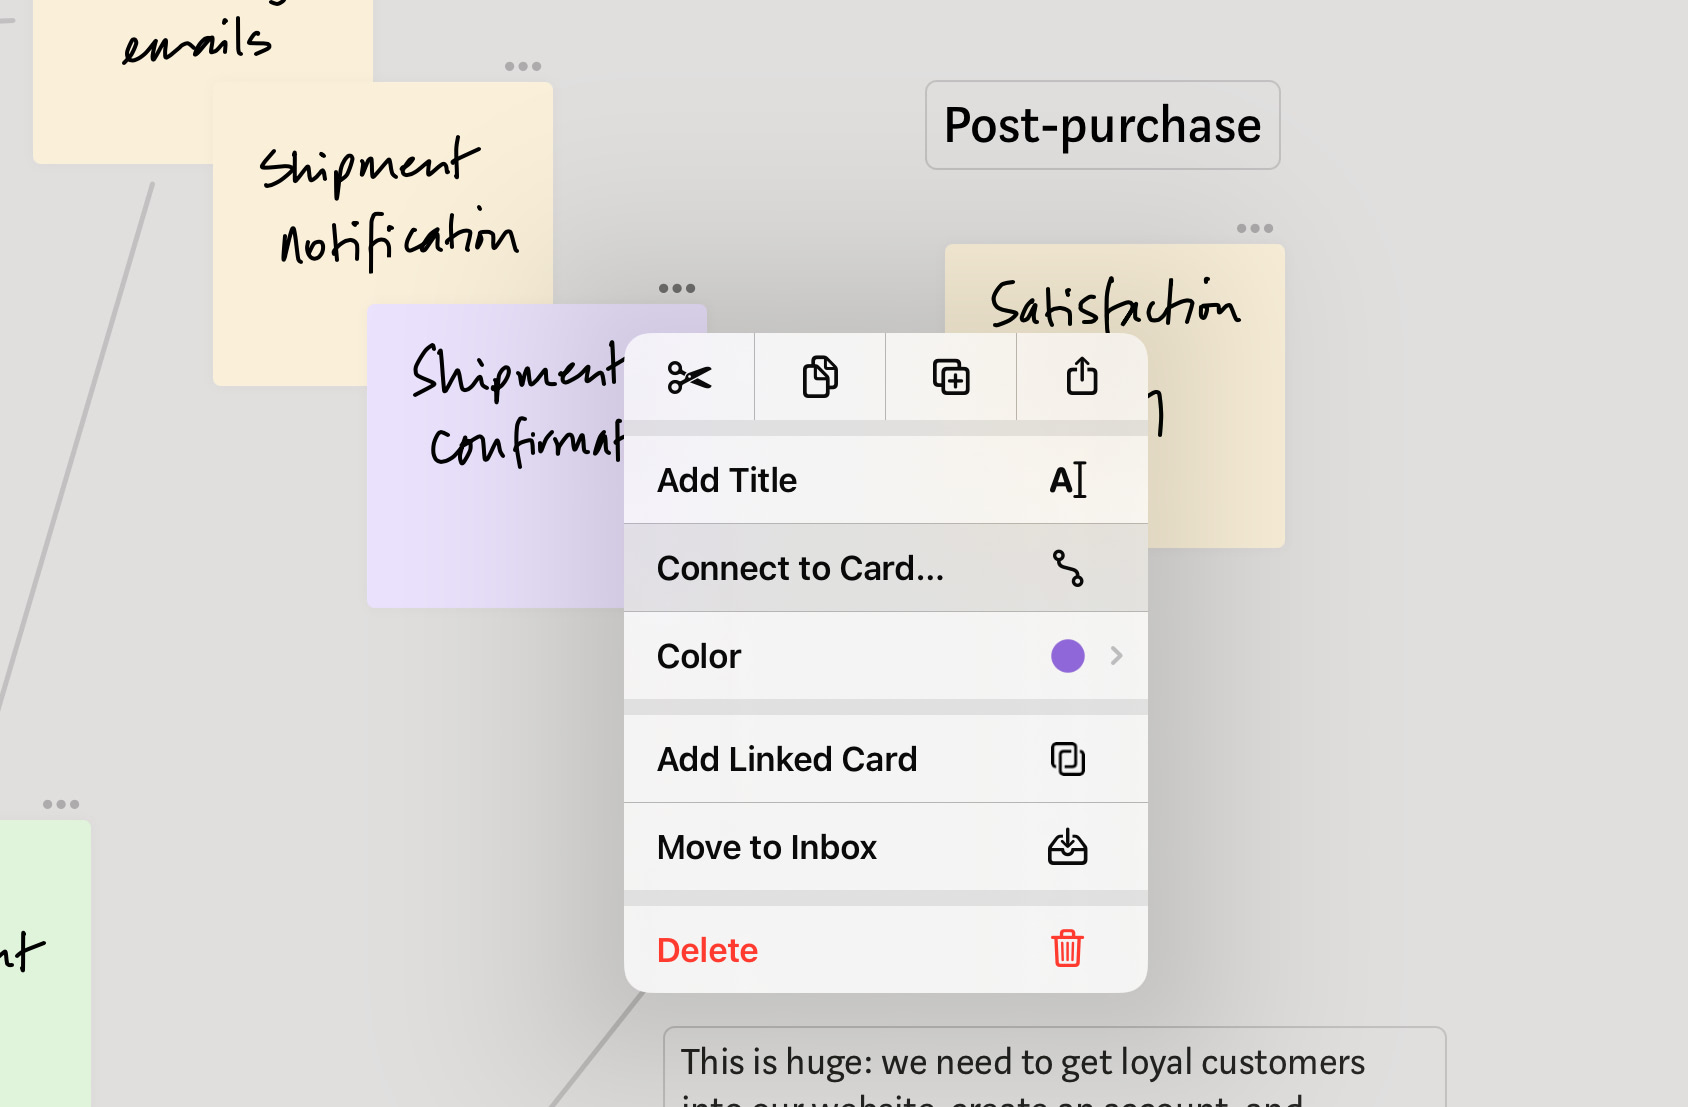
Cards
Any media content you add to a board will be added as a card. Cards can be moved, resized, duplicated, and deleted as your Muse board evolves.
Resize cards by dragging their bottom right corner.
On iPad, tap the 3 dots in the top right corner of a card to open its card menu. On Mac, you get the same menu by right-clicking the card.
On iPad, you can also delete cards by dragging them off the edge.
| Type | Details | Shortcut |
|---|---|---|
| Notes | Great for short annotations and fixed-size “sticky notes”. | N |
| Images | Images can be excerpted like PDFs. | P |
| Videos | Can be played directly on the Muse board, or opened for fullscreen playback. | |
| PDFs | Full documents which can be opened, read, annotated, and excerpted. | |
| Links | Paste a link to create a link card. Double click or double tap to open. | |
| Tweets | Paste a Twitter link to add a Tweet card. You’ll get separate cards for each attached image and link. | |
| Files | Any file you add to Muse will be copied to your Muse data; double click them to open. | F |
| Comments | Comments can be placed anywhere on the canvas, and evolve into threads. | C |
Connection tool
Add connections between any cards, board cards, or text blocks.
Ways to connect cards:
- Use the connection icon in the toolbar.
- On Mac, right-click and select Connect to Card…. On iPad, use the option in the card menu. Then select the card you want to connect to.
- Select a card / text block, ⌘ + Shift + C, then click or tap the card you want to connect to.
Card Alignment
Card alignment lets you quickly organize cards on a board. Align card edges using the Format and context menus on both iPad and Mac, or using the keyboard shortcut ⌘ + ⇧ + (arrow key).
Example:
Align cards on the Mac or iPad with attached keyboard using the shortcut ⌘+⇧+(arrow key).
Align cards on the iPad using the context menu.
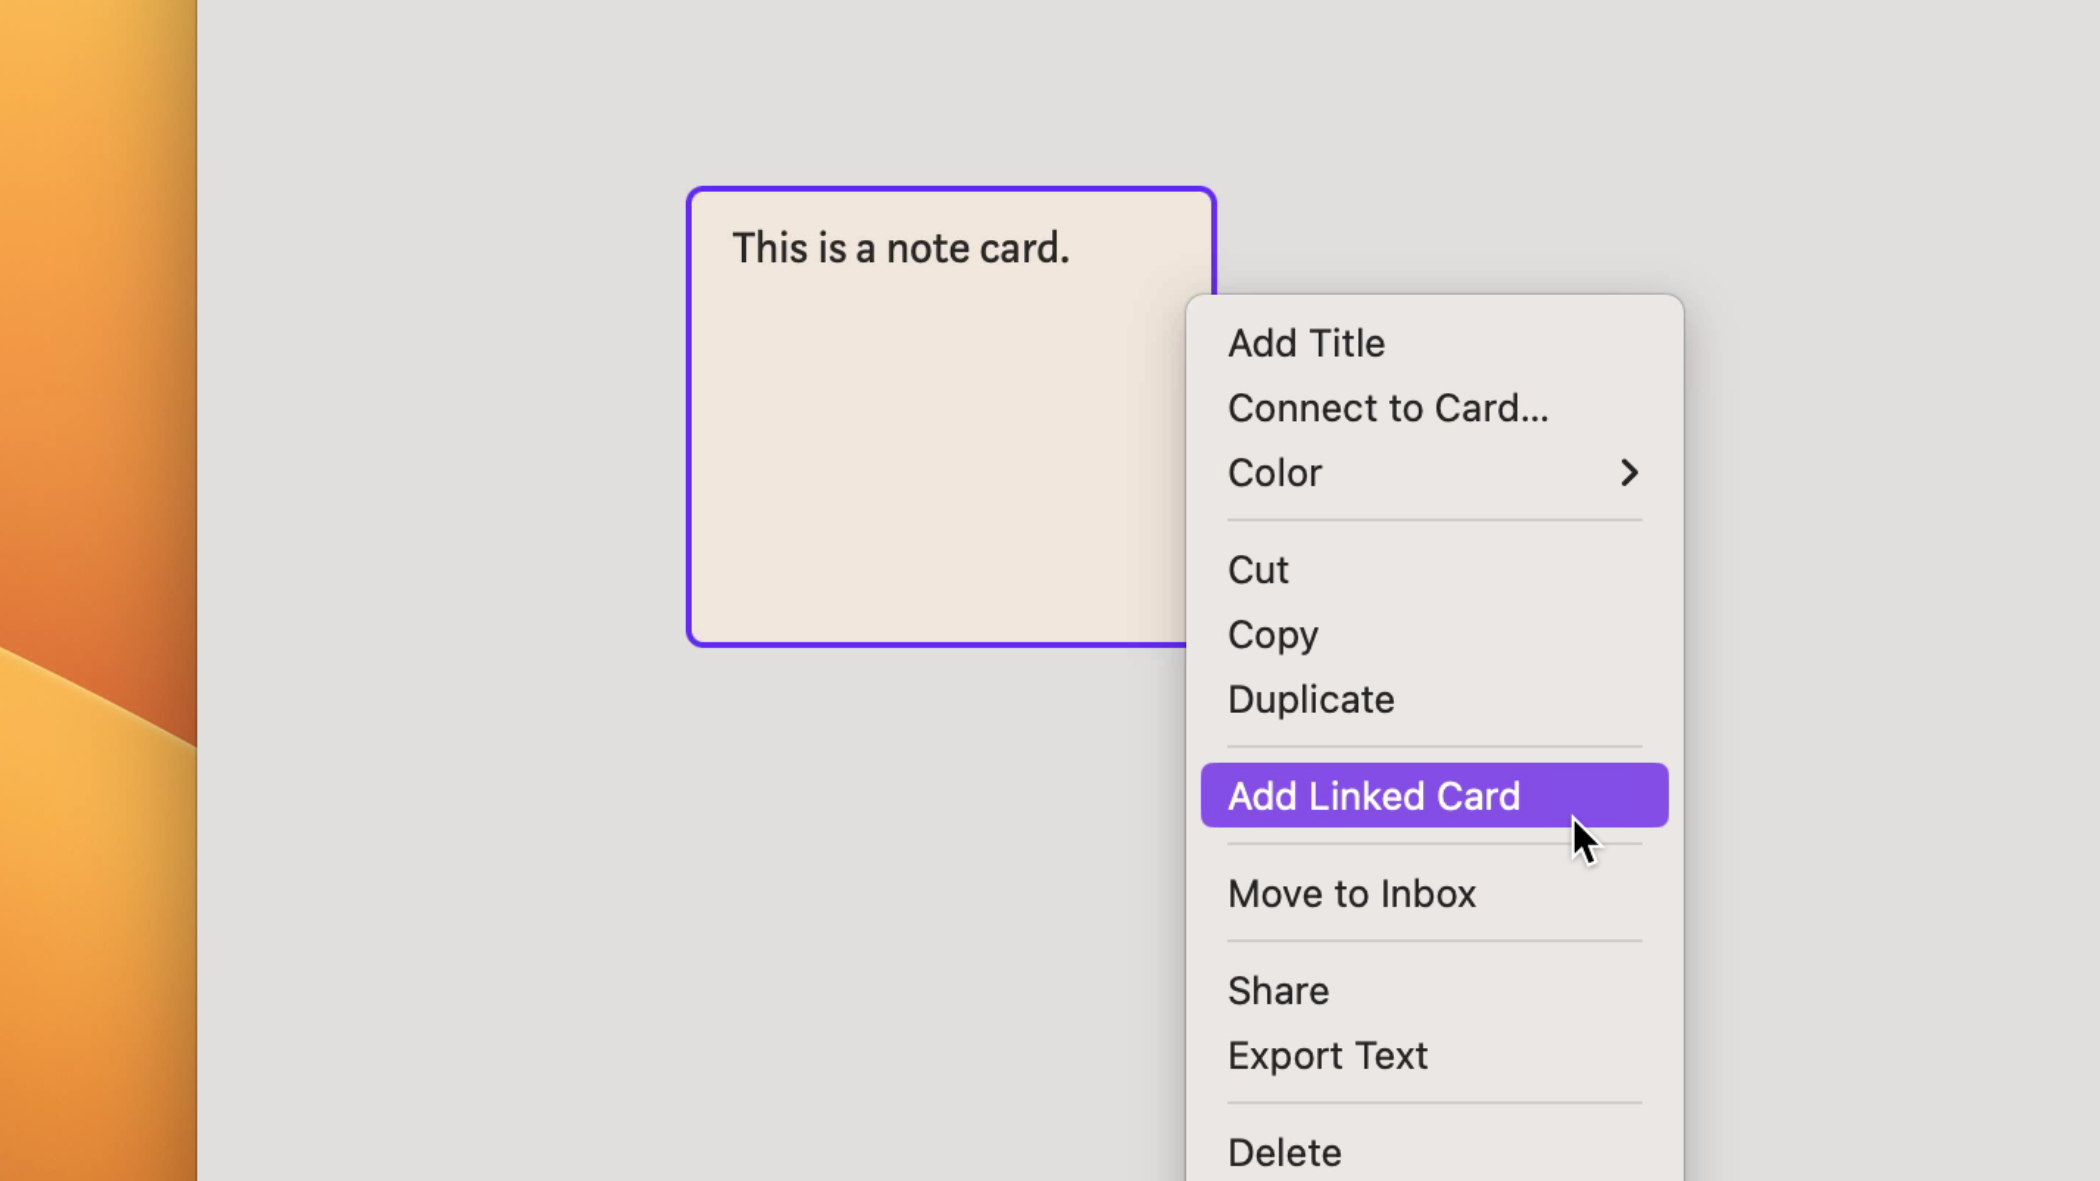
Linked cards
Linked cards are copies of a card which point to the same content. You can add linked cards for boards, images, videos, PDFs, and note cards.
Any changes you make to the content of the card will be represented in all other copies. You can use linked cards to reference boards which are related to your current work but located elsewhere, or use them to create shortcuts to often-used but deeply-nested boards.
Adding a linked card
On Mac, right-click → Add Linked Card. The linked card will appear in the inbox.
On iPad, use the option in the card menu.

Locations
Clicking or tapping on the icon will show you where the other linked cards are, and you can navigate to them from the list.
![]()
For boards that have linked cards, you can see all the links to it in the sidebar. Use these to switch locations.

Unlinking a card
Unlinking a card will turn that card into a standalone copy of the content, while keeping other cards linked.
On Mac: right-click → Unlink card
On iPad: card menu → Unlink card
Text & Ink in Muse
Thinking — privately or collaboratively — works best when you have the freedom to express your thoughts in different formats. In Muse you can do so with text blocks, notes, and ink.
Text Blocks
Muse integrates block-based text editing (like you’d find in Notion or Craft) into the infinite canvas of your boards. Text blocks in Muse aren’t restricted to linearity. You can move text blocks anywhere on the canvas, and can even drag out individual blocks to continue your train of thought elsewhere.
Adding a text block
Double-click or double-tap anywhere on the canvas to add a text block or use the icon in the toolbar at the bottom. Each paragraph becomes its own block.
![]()
Reordering text blocks
You can reorder text blocks within a group or drag a block out to disconnect it from the group.
Hold Shift to move the entire text group.
Drag the right edge of a text block to change its width. Resizing a text block within a group will change the width of the whole group.
Styling text blocks
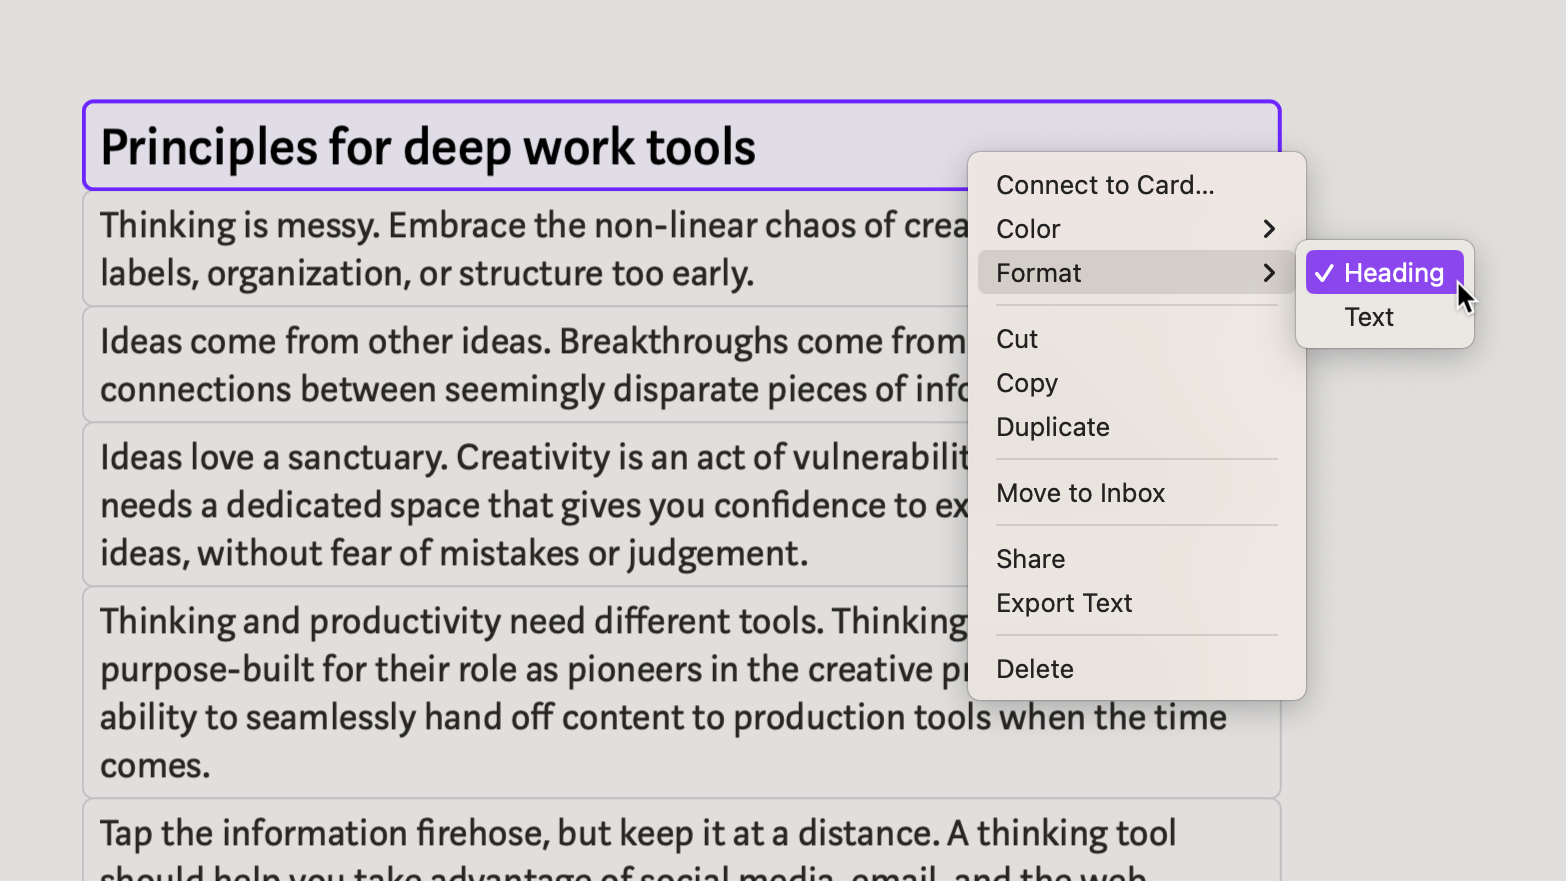
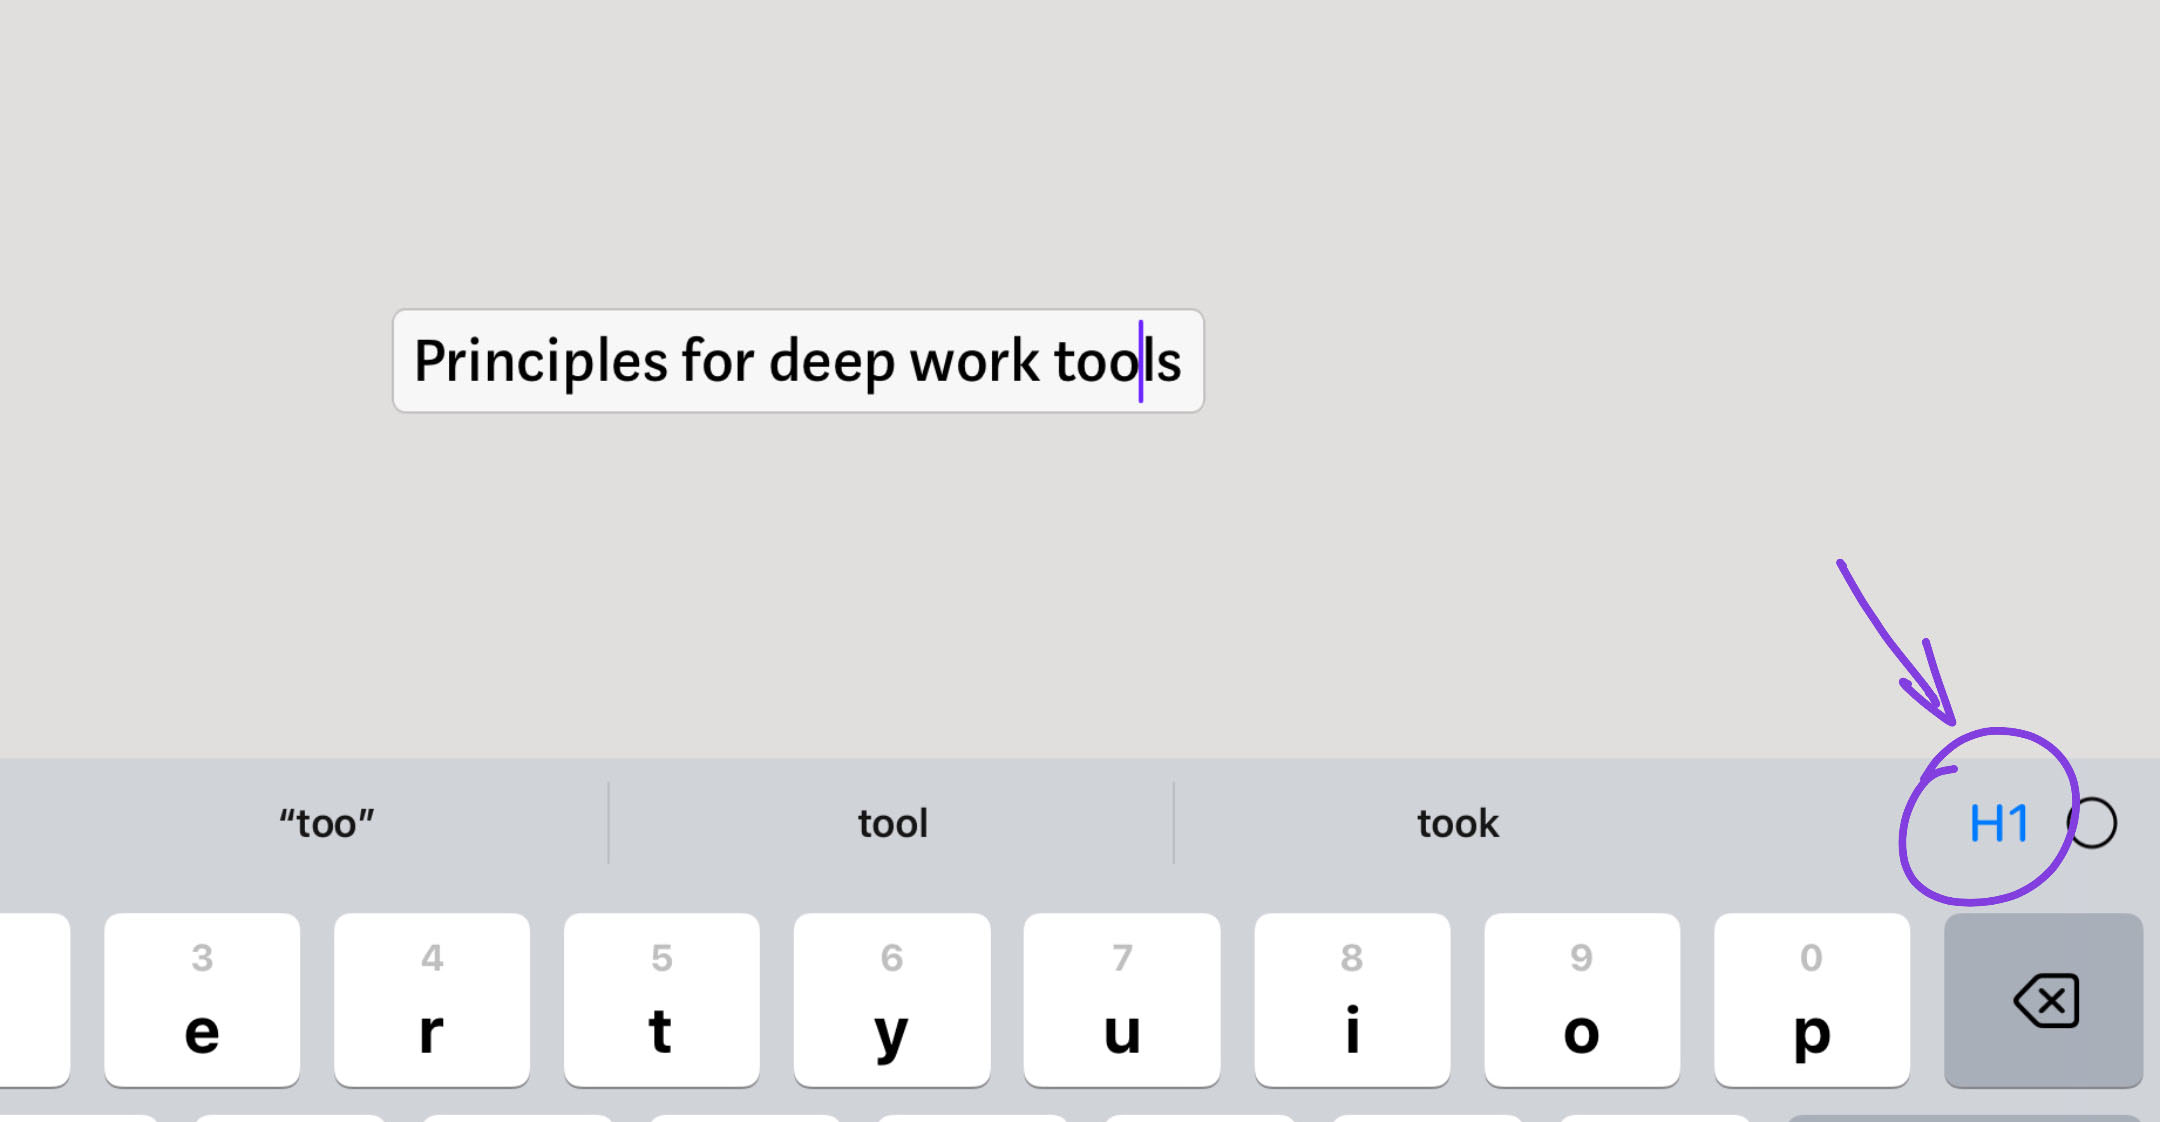
Format into heading
Turn any text block into a heading.
On Mac: Right-click → Format → Heading. Keyboard shortcut: ⌘ + Option + 1.
On iPad: Tap on text block to enter edit mode, then tap “H1” in the top right corner of the onscreen keyboard.
Color a text block
Add a background color to each block. Select multiple blocks to color them together.
On Mac: Right-click → Color → Choose color.
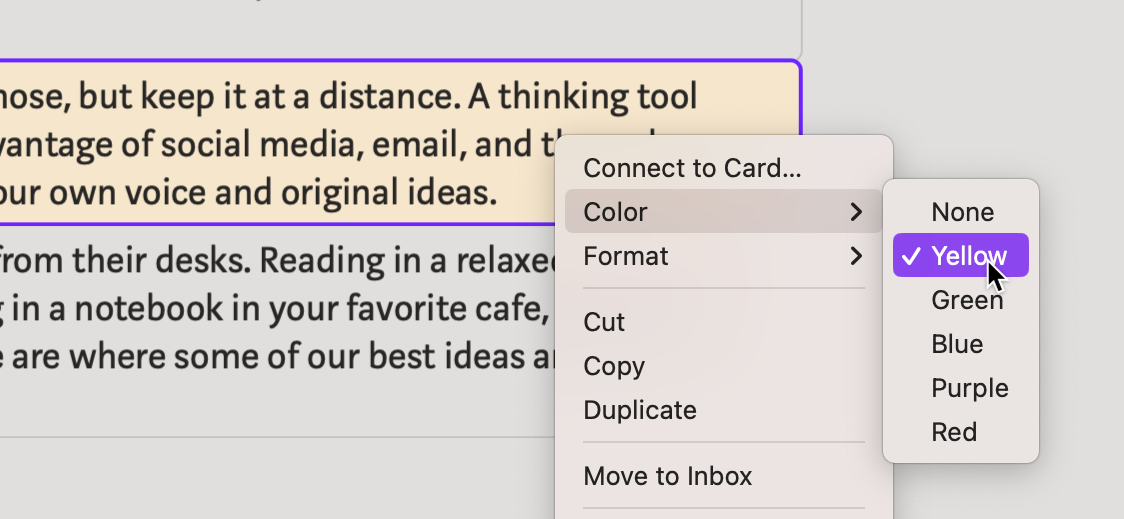
On iPad: Use the color option next to H1.
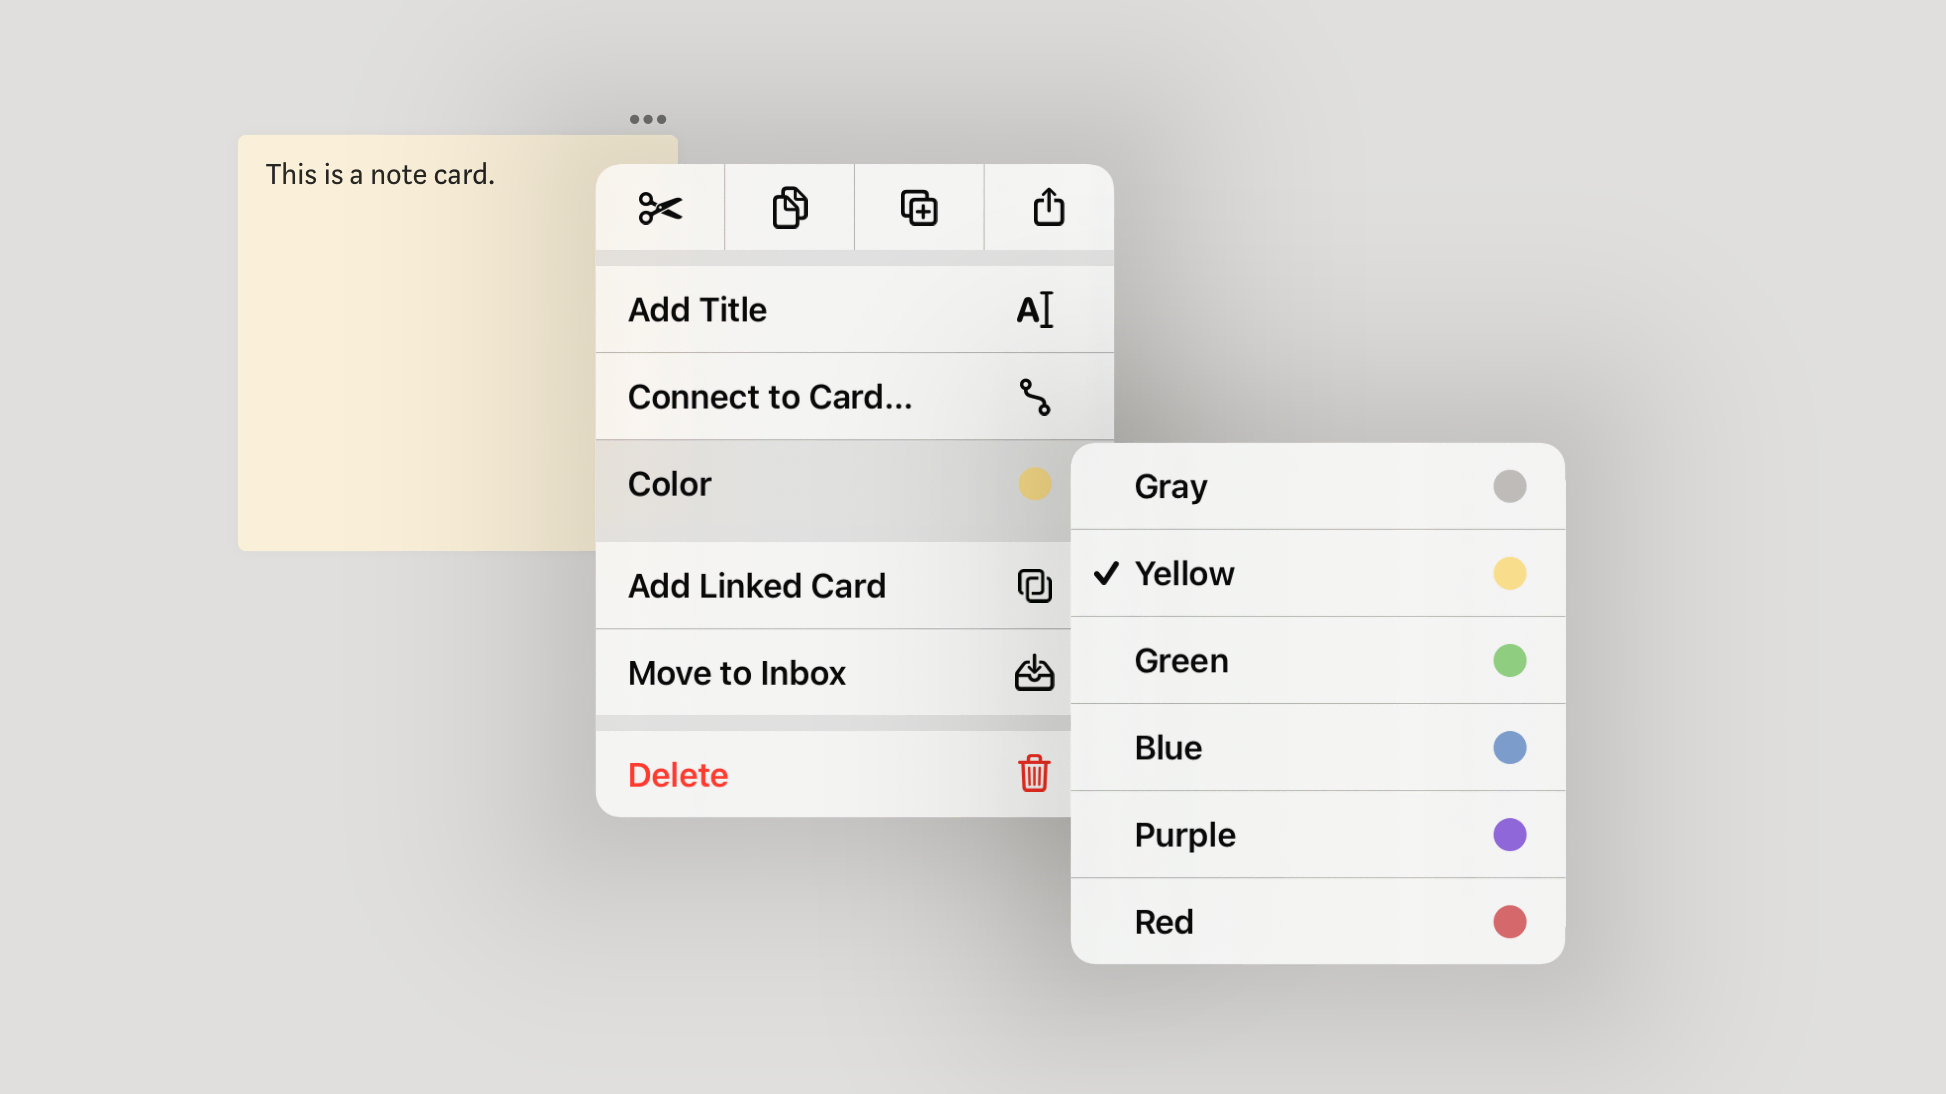
Note Cards
Note cards are like sticky notes that you might use on a whiteboard. They’re great for brainstorming, mapping, workshopping, etc. However, in Muse note cards are even more powerful. You can add linked cards for notes, meaning you can have the same note appear in different places and edit all of them at the same time.
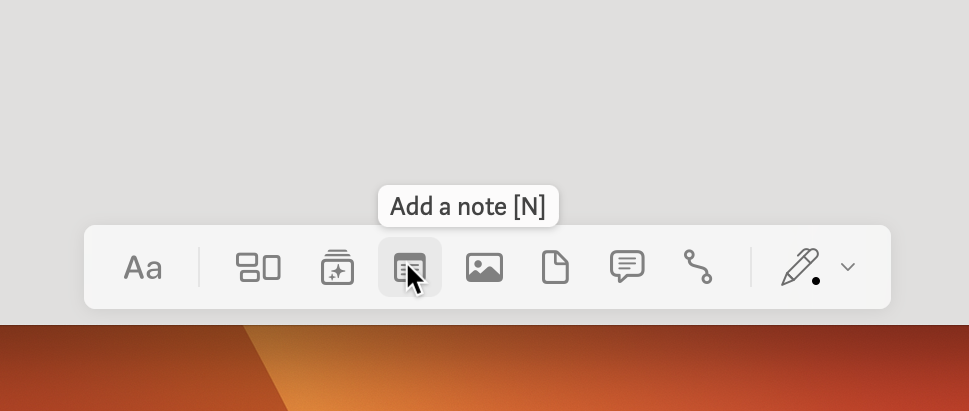
Adding a note
To add a note, use the icon in the toolbar or the keyboard shortcut N.
Resize the note by dragging the bottom right corner.
Type on a note or use the Pencil on iPad to write and sketch, or do both!
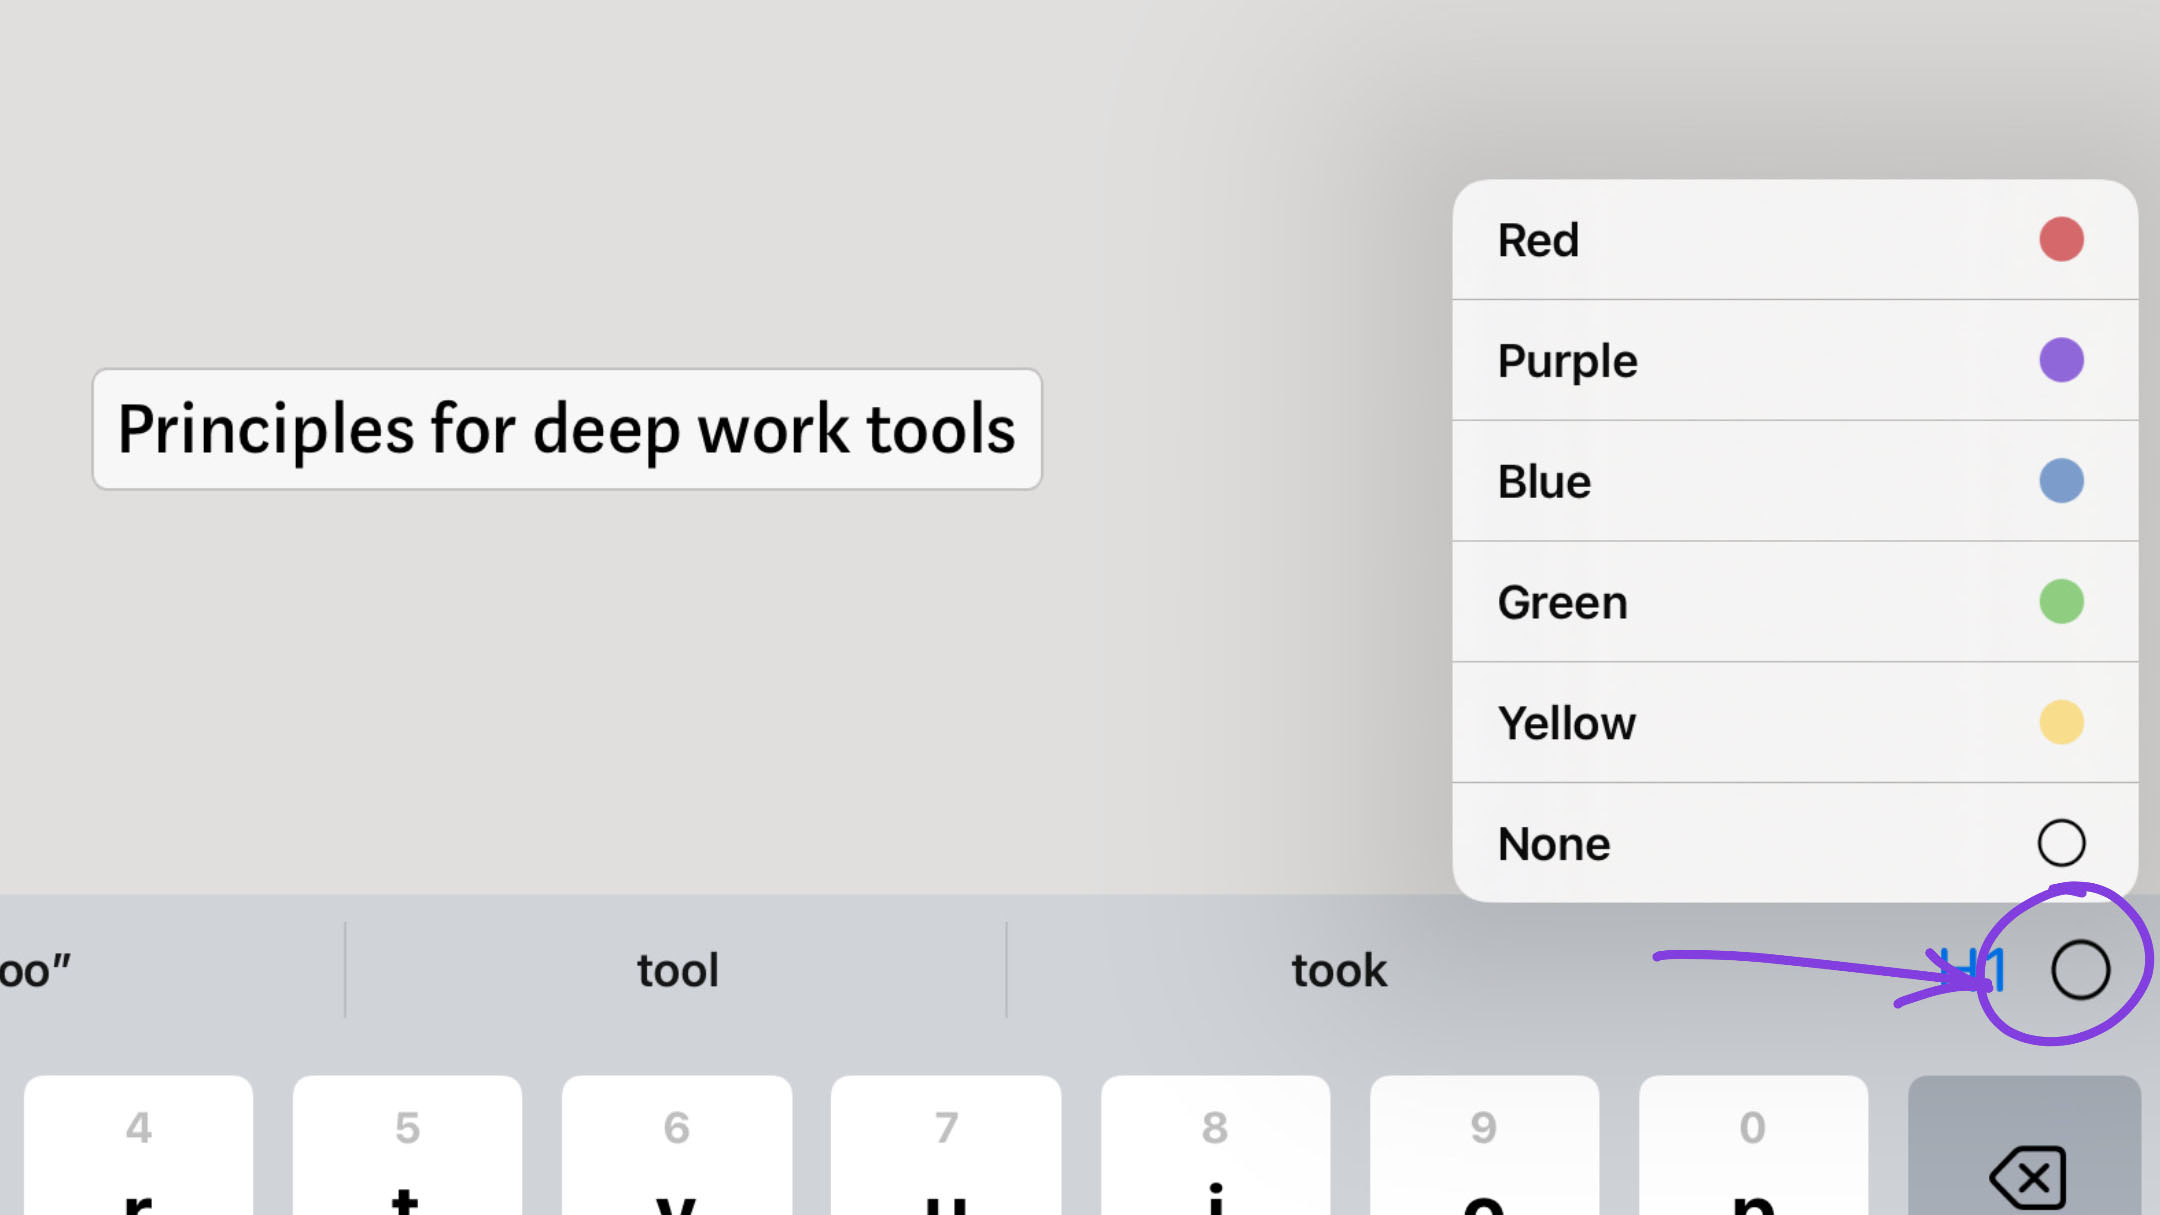
Styling a note
Notes can be colored just like text blocks.
On Mac: Right-click → Color

On iPad: Tap on the card menu → Color
Adding a linked card for notes
You can add a linked card for notes just like any other cards.
On Mac: Right-click → Add Linked Card. The linked card will appear in the inbox on the left.
Changes (editing text, changing color) you make to one linked card will be reflected on all other linked cards.
Editing a linked note card
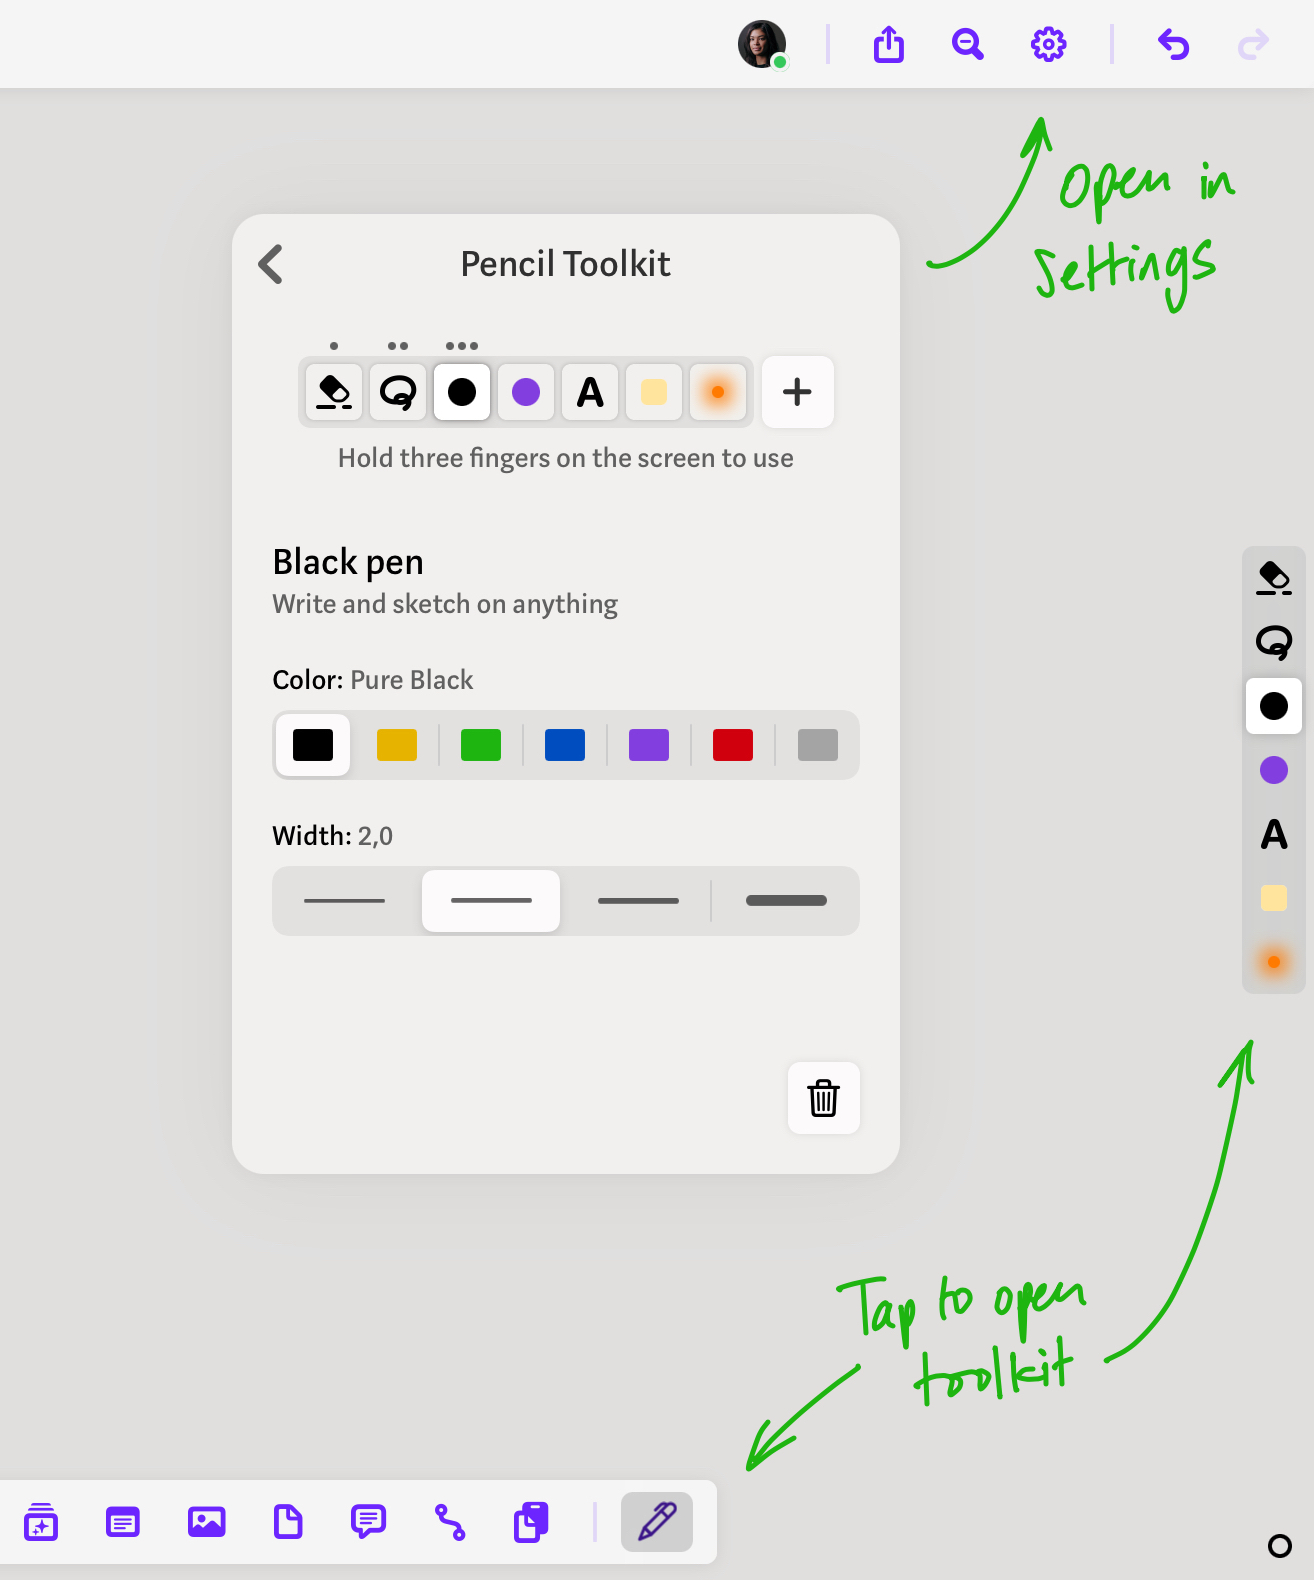
Ink & Pencil Toolkit
Inking works best on iPad using a Pencil. The minimal toolkit is designed to help you stay focused and not get distracted by endless options of colors and styles.
All the pen tools are available on Mac as well. Use the pen icon to open the toolkit and start drawing with your trackpad or mouse.
The toolkit
Click the pen icon to open the Pencil toolkit. You can configure your toolkit in Settings.
On iPad, you can also use the Pencil to swipe in the toolkit from any edge of the screen.
Quasimodes: The first 3 tools in the toolkit can be switched between without using the toolkit by touching 1/2/3 fingers on the canvas while using the Pencil. For example, with the eraser in the first toolkit slot, hold down one finger while using the Pencil to erase.
Selection tool (iPad): On iPad, you can select content using the Pencil with the selection tool in the toolkit. Hold the Pencil at a high angle to create a freeform selection; hold it at a low angle to create a rectangle selection. Drag selections with your finger to move all content; drag them with the Pencil to only move ink.
Multi-card lasso selection: You can draw a freeform lasso around multiple cards to select them all at once. On iPad, hold 2 fingers on the canvas while drawing with the Pencil to activate the selection tool via quasimode (the second toolkit slot defaults to selection). On Mac, hold Option and drag to create a freeform lasso selection instead of a rectangle selection.
On iPad, you can select multiple cards without the Pencil by using the quasimode for the selection tool (see above), then tapping on cards to select them.
Swipe in toolkit with the Pencil.
Using Text Blocks & Note Cards
Here are some examples of how you could use text blocks, note cards, and ink together — some of these are inspired by screenshots we’ve seen from other users!
Use text blocks for long-form writing, like drafting an article, and note cards for reminders, or as extensions to the main body of text.
Use text headings, note cards, and the connection tool to build a quick roadmap.
Note cards also work well for longer paragraphs or even essays as they mimic sheets of paper.
Collaboration
Everything you need to know about collaboration in Muse.
Shared Workspaces
Add collaborators to any workspace so that you can think, plan, and strategize together.
Note: Everything in a workspace will be shared with your collaborators. It is not possible to share individual boards only.
Team Presence
The collaborative features satisfy all the needs of remote live collaboration, but realtime editing and following is only one part of what makes teamwork great.
List of collaborators
In the sidebar, you can see who’s online and see where they are when you hover over their name. Click on their avatar or name to follow them. Click on your own name to edit your name and avatar.
People in other boards
When you’re exploring your workspace spatially, you’ll be able to see your collaborators’ avatars in the corner of boards that they are currently in. Click them to follow the user.
![]()
Live pointers
Follow people’s movements with live pointers. Mac users show up with a cursor and avatar. For iPad users, the center of their screen is indicated with their avatar.

People in the same board
Apart from live pointers, you can also see who’s in the same board as you in the navigation bar at the top. Clicking on an avatar will follow that person.
Follow
Click on an online user in the sidebar, or click their avatar on a card, to jump to the content your colleague is looking at. You’ll start following them as they scroll or navigate elsewhere. If you navigate away, you can easily jump back to your colleague’s view at the click of a button.

Comments
Add and place comments anywhere on a board — use the icon in the toolbar or the keyboard shortcut C. Click on a comment thread to expand it and to continue it with a reply.
Sharing Your Work
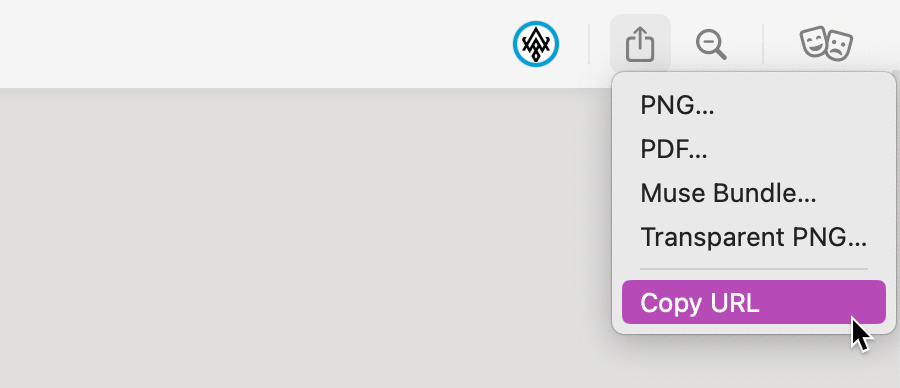
Copy URL
Copy a web link to a board by selecting “Copy URL” in the menu, and share it with your collaborators via Slack, email, etc. If they have Muse installed, it will open directly to that board. If opened in a web browser, the viewer will see a preview page with the board title and a button to open in Muse.
Dark Mode
Muse automatically matches your device’s light or dark setting, so there’s nothing to configure. It works on Mac, iPad, and iPhone. If you prefer to lock Muse to one mode, you can override this in Settings → Appearance (choose Always Light or Always Dark).
A couple of things worth knowing: PDFs and images always display on a light background to preserve their original colors, and exports always use light mode so they look consistent when shared.
Troubleshooting
Sometimes things go wrong. Here are a few approaches for diagnosing and possibly fixing the problem.
Restore last deleted card
If you think you accidentally deleted a card (including a board) at some point, try this.
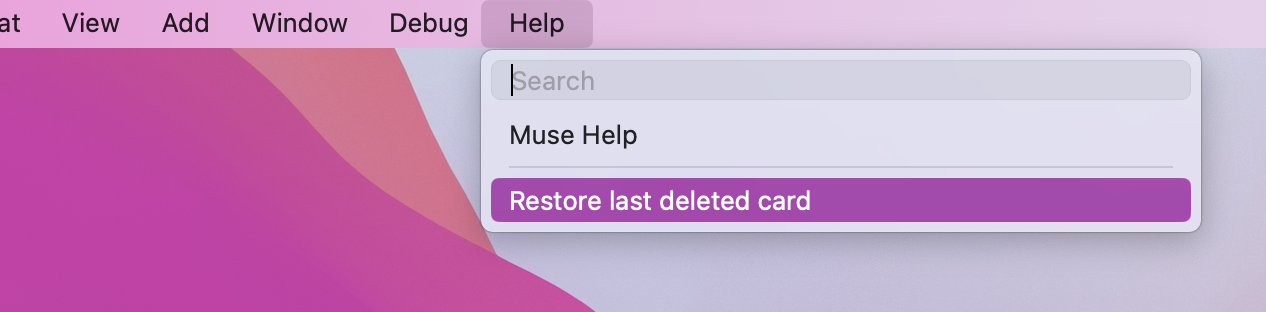
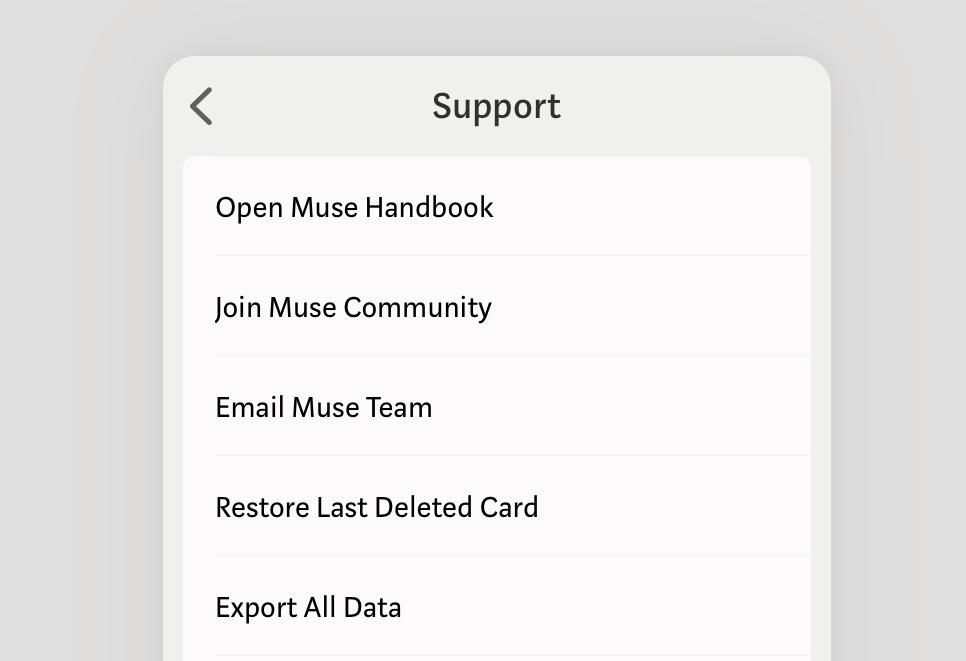
Mac: Help → Restore last deleted card
iPad: Settings → Support → Restore Last Deleted Card
This menu item will add the most recently-deleted card to your inbox. You can use it multiple times to go down the stack of recent deletions, up to two weeks old.
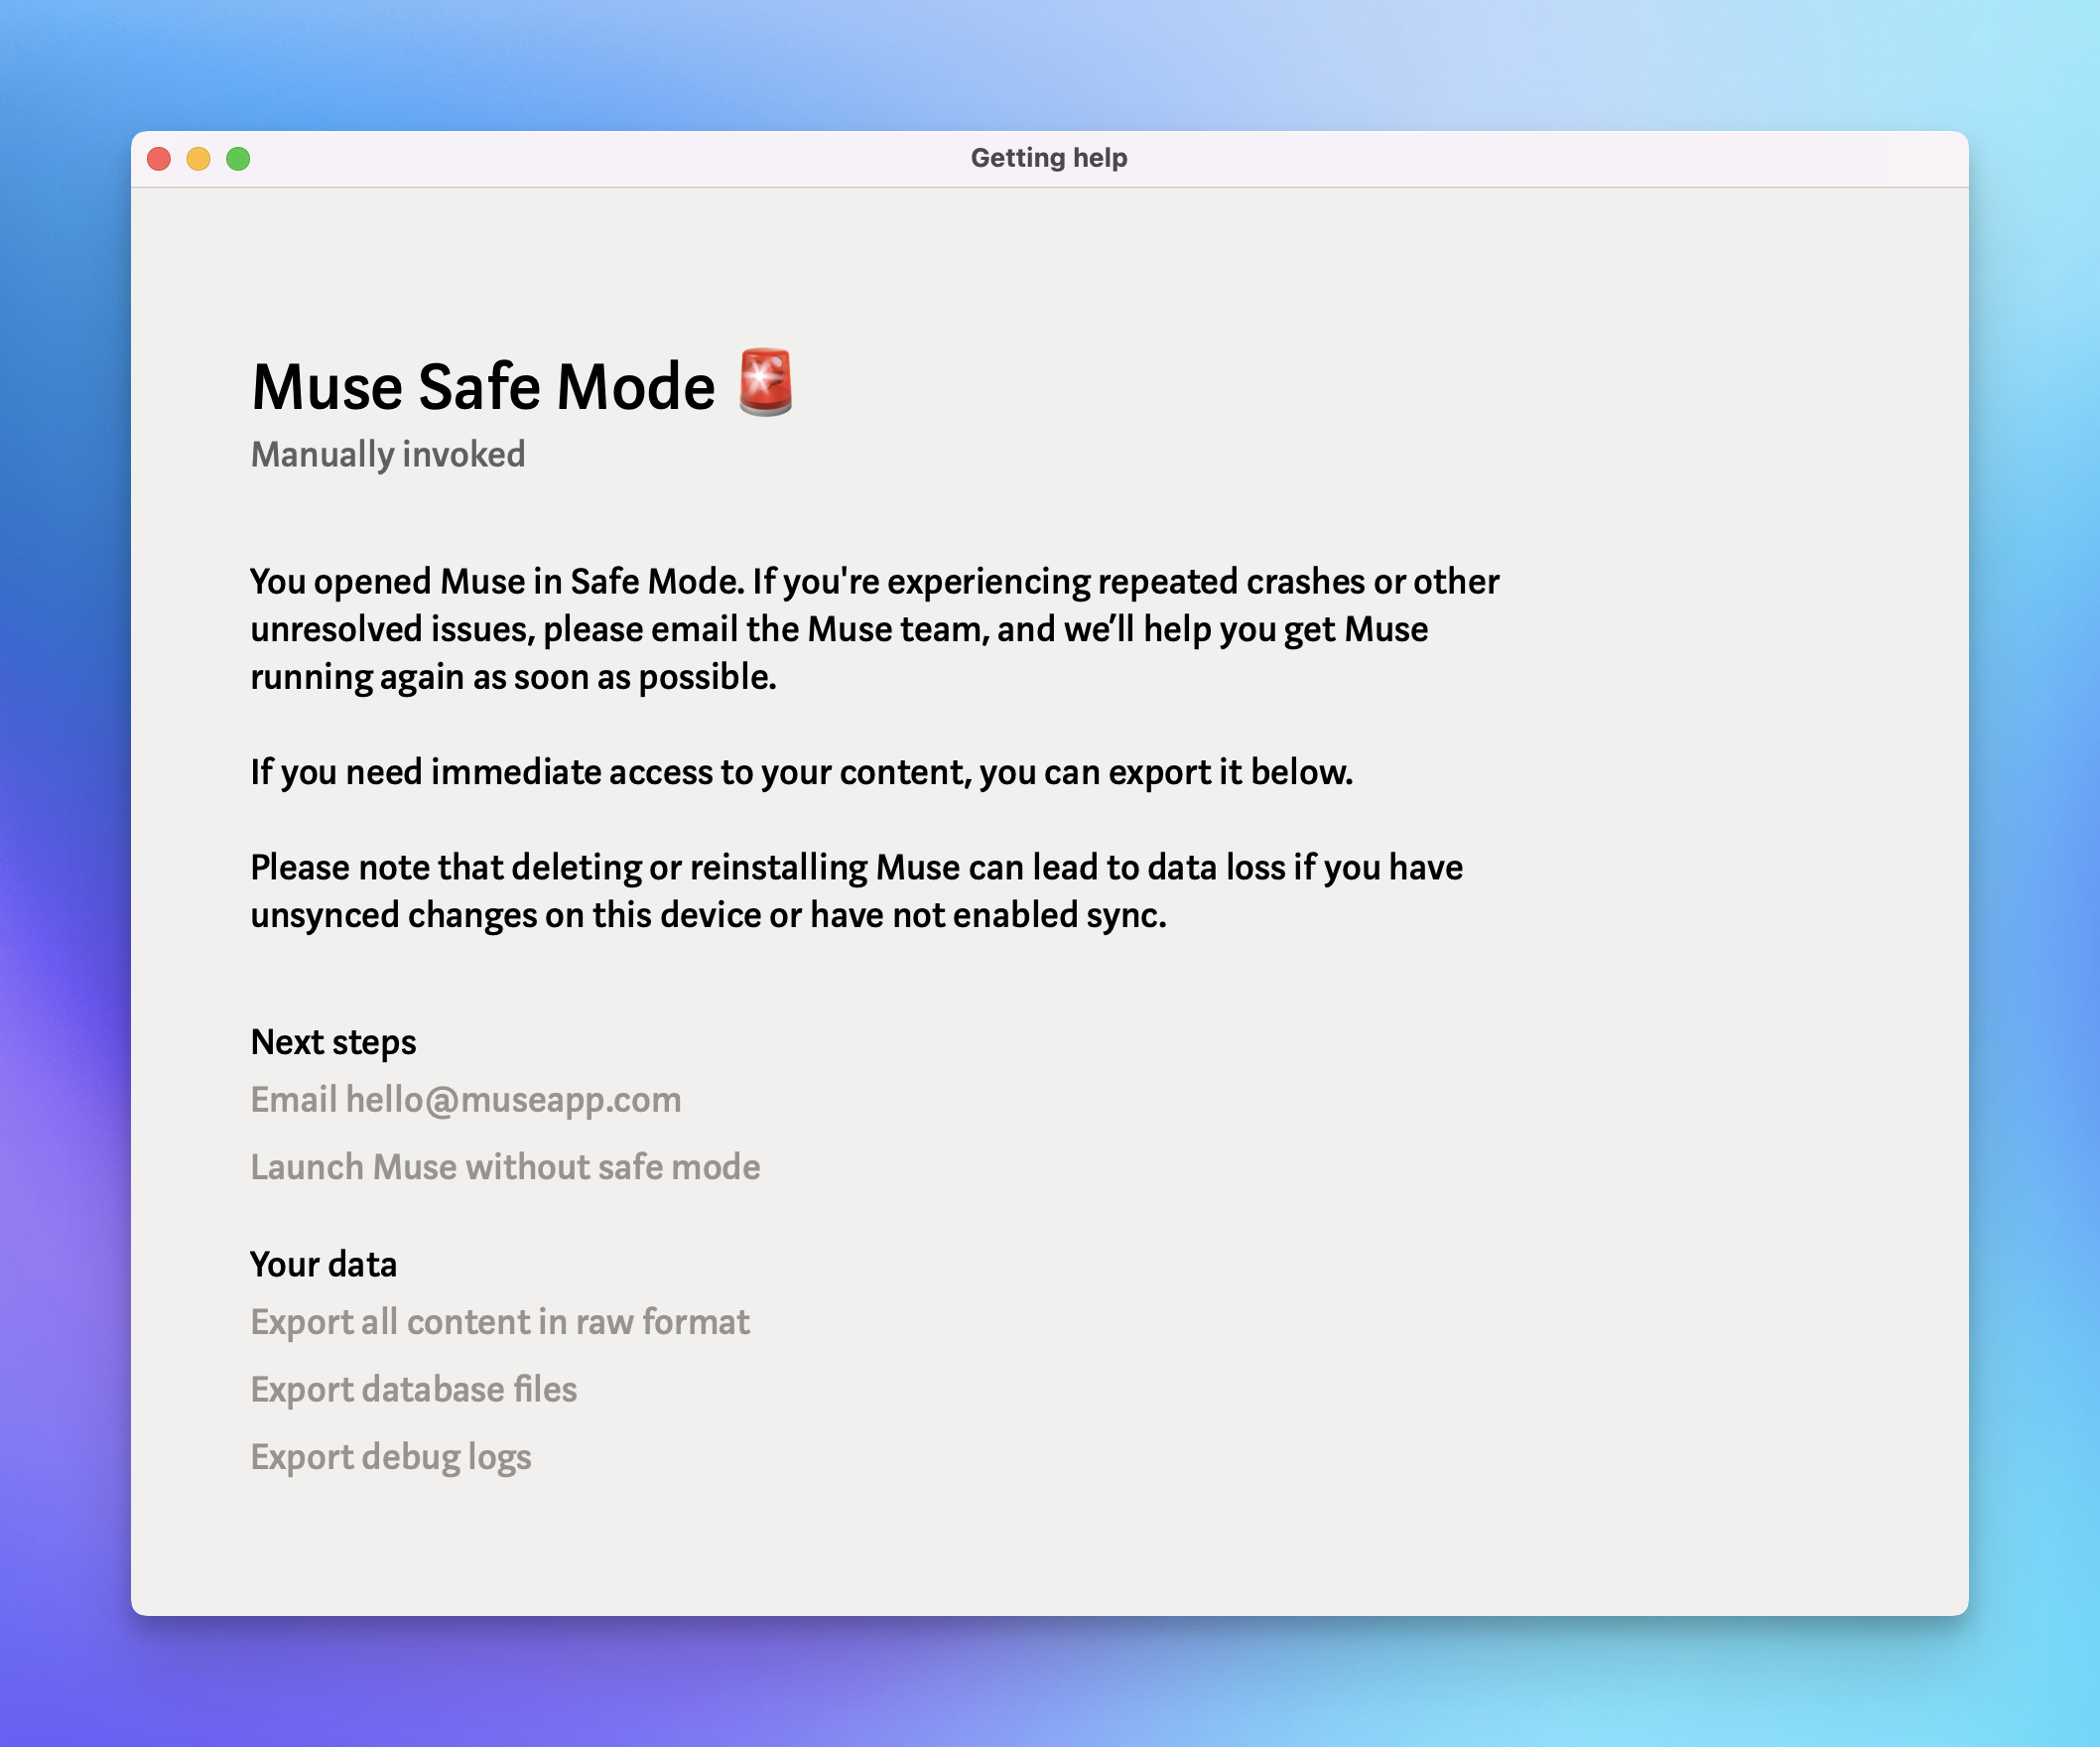
Safe Mode
Muse will automatically enter safe mode if you experience too many crashes in a short time.
You can also use this if your Muse seems to be “stuck” in a state that you can’t get out of, like a board that you can’t leave. To invoke safe mode manually, copy-paste the following address into your web browser (e.g. Safari):
museapp://safe-mode
This will take you to a screen where you can try launching Muse again, or export your raw content and/or logs for debugging.
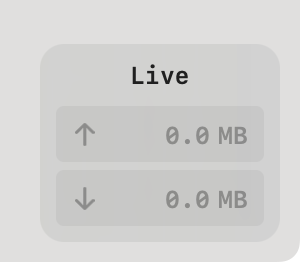
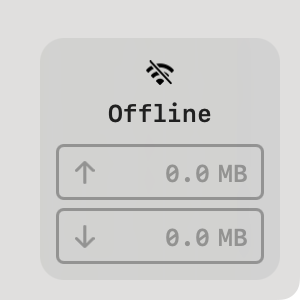
Sync Indicator
In the lower-right corner of your Muse window is the sync status indicator.
The indicator pulses faintly when there is sync network activity happening. It’s an empty circle when you’re offline.
Tap the indicator to open more detail, including the amount of data queued for upload and download:
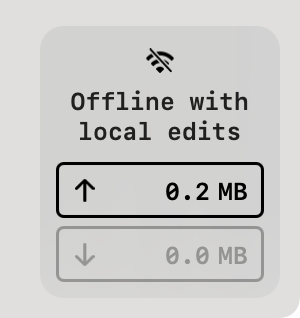
Right-click the sync indicator to access a detailed network panel, network logs, or to disconnect from the Muse sync server without needing to turn off your computer’s wifi.
Data Reset
Very occasionally, local Muse data can get into an unexpected state. For example, images which are failing to download, or an apparent difference between two of your devices.
You can report a bug to the Muse team, but a quick fix can sometimes be the classic approach of turning it off and on again.
- Level 1: Quit (via menu on Mac or force-quit on iPad) the Muse app and restart.
- Level 2: Log out (via the button in Settings/Preferences → Profile) and log in again using the same email address and a new login code.
- Level 3: Nuke the site from orbit by deleting the app on iPad or running this command (with Muse closed) on your Mac’s Terminal:
defaults delete com.musesoftware.museios-appstore && rm -r ~/Library/Containers/com.musesoftware.museios-appstore && rm -r ~/Library/Group\ Containers/group.T68Z94627S.com.musesoftware.museios-appstore
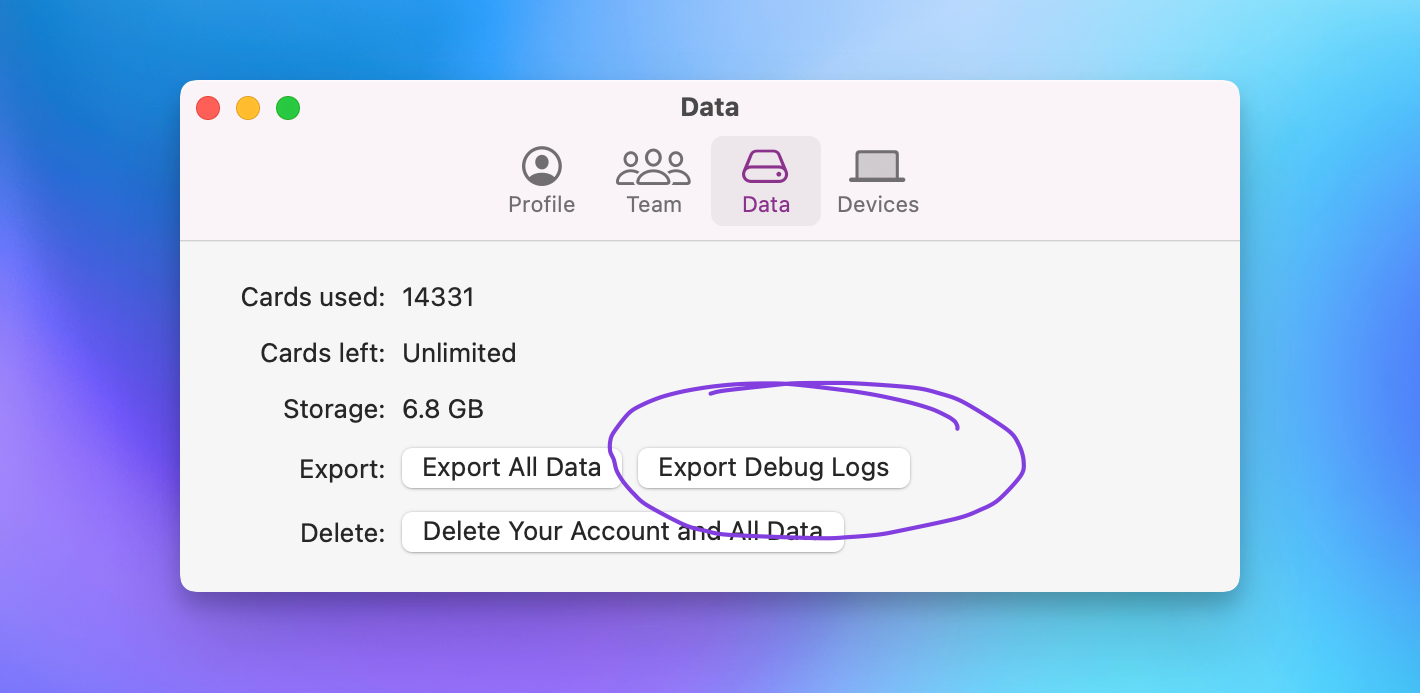
Delete Your Account
If you wish to completely delete your account including removing all the data from Muse’s server, use Preferences/Settings → Delete Your Account and All Data.
Contact Muse Support
Need more help? Reach out to Muse support, or visit the Muse community to ask other Muse users for advice.
Support
If the troubleshooting section didn’t help solve your problem, here are some ways to speak to the Muse team.
Community Support
Join our Discord to swap tips and tricks, get advice, suggest features, and share your workflows with other Muse users. Our team is part of these discussions as well.
Email Support
If you prefer to speak privately to our team, you can email hello@museapp.com or use the in-app feedback in the Muse sidebar. Email support is usually best for bug reports where you want to include attachments like debug logs, or account issues like changing your email address.
If you’re having trouble with a specific card, you might also be asked to log that card’s metadata to the debug logs.
Log a Card’s Debug Information
How to Report a Bug
If you’ve found what appears to be a bug in Muse, you can help our team fix it by providing all the info we need right off the bat. That includes:
- A screen recording (Mac, iPad) of the problem happening
- A reproducible test case with steps e.g. “1. Navigate to a sub board 2. Click on the parent board in the toolbar 3. …”
- What happened vs what you expected to happen
- Export debug logs immediately after the problem occurred
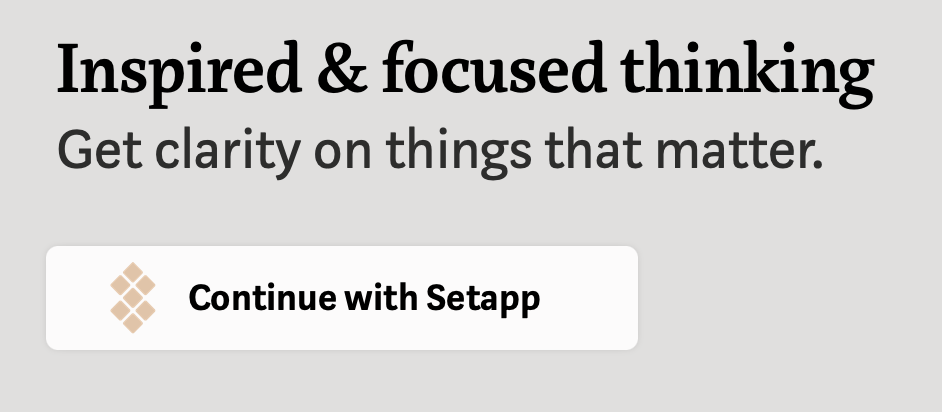
Muse in Setapp
Muse is available in Setapp! Setapp is a subscription service that offers a curated collection of high-quality iOS and Mac apps for one monthly fee, and Muse is included in the Setapp library. The Setapp plan starts at $9.99/mo and gives users access to not just Muse, but all apps within the Setapp library. Setapp subscribers will enjoy unlimited workspaces, cards, and up to 5 collaborators with Muse.
Get started with Muse in Setapp
Frequently Asked Questions
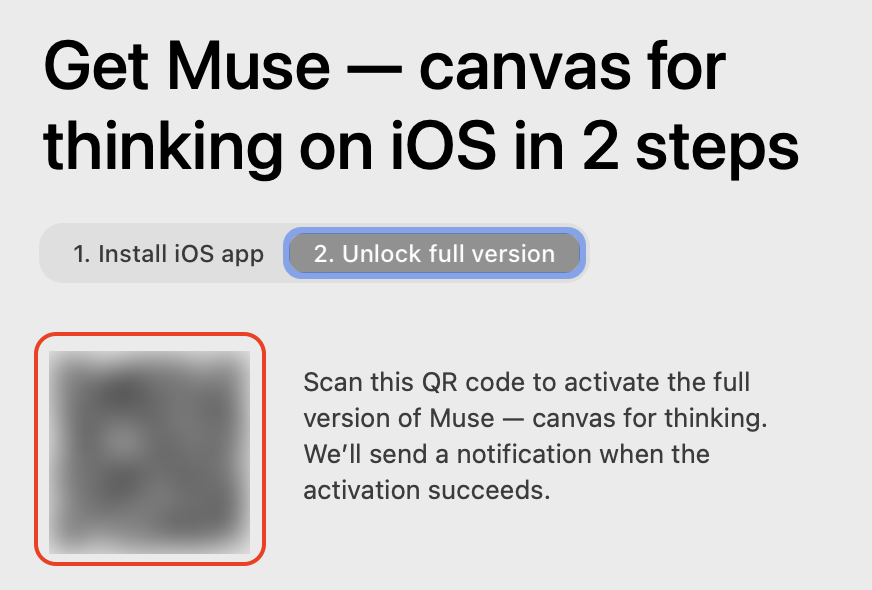
1. How do I log into Setapp for Muse on iPad and iPhone?
- Install the Setapp Mac app from Setapp.com
- From the Muse page in the Setapp app, click Get iOS App
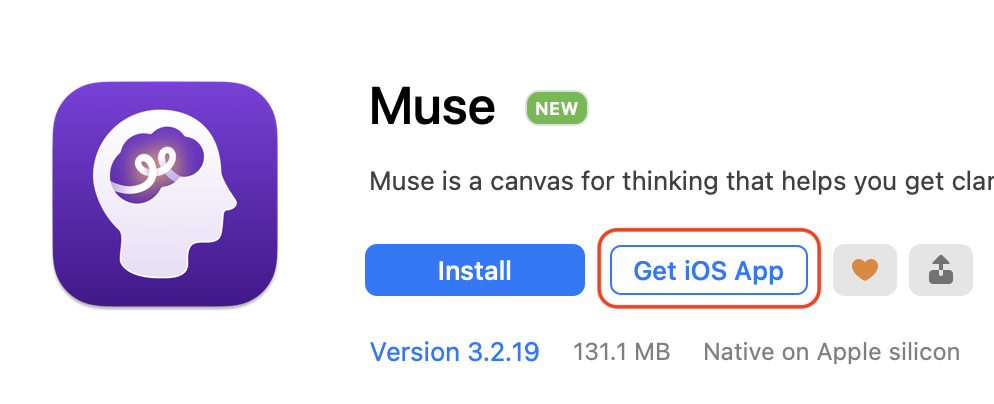
- If you haven’t already, download the Muse iPad or iPhone app to your device from the Apple App Store.
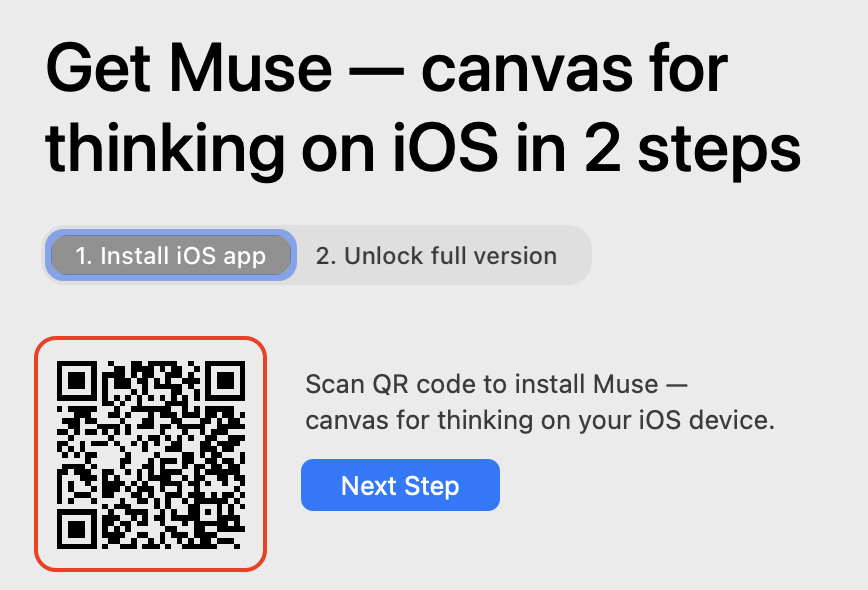
- Scan your personal Setapp login QR code on your iPad or iPhone
2. How do I log into Setapp for Muse on Mac?
- Install the Setapp Mac app from Setapp.com
- From the Muse page in the Setapp app, click Install
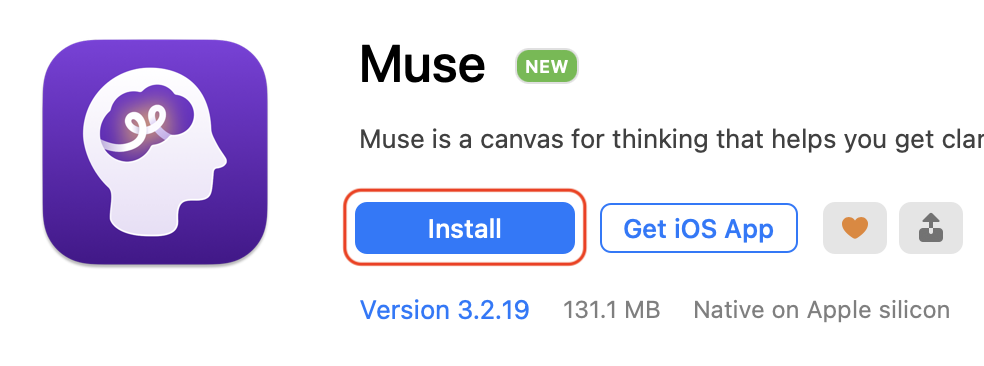
- Launch Muse, and log into Muse using your Setapp account
3. Why does Muse say my Setapp account is inactive?
Your Setapp subscription is not currently active. Please follow these steps in your Setapp account to renew your subscription.
If you have any questions or concerns about your Setapp subscription in Muse, just reach out to hello@museapp.com for help.
4. I have a Muse account already, can I use Setapp?
Yes! You can attach your Setapp account to your Muse account and enjoy all of the benefits of your Setapp subscription within Muse.
If your Setapp email address is the same as your Muse account email, you can simply download Muse on Setapp and login.
If your Setapp account uses a different email address than your Muse account, then you’ll need to link your Setapp account to your Muse account.
To link your Muse account to Setapp on iPad or iPhone:
- Log into your Muse account like normal on your iPad or iPhone
- Follow the instructions in Question 1 to login to Setapp on your iPad or iPhone
- This will attach your Setapp account to your Muse account
- After this, you can login to Setapp through the Muse Mac app on Setapp
If you only use Muse for Mac, and your Muse account email is different than your Setapp account, please contact hello@museapp.com for help attaching your Setapp account.
If you have any questions or concerns at all about how to use Muse with Setapp, just reach out to hello@museapp.com for help.
5. I already have a Muse subscription, how do I move to Setapp?
- Make sure your Setapp account is active and in good standing, or sign up for a new Setapp account if you don’t yet have one.
- Attach your Setapp account to your Muse account using Question 4 above
- Cancel your Muse subscription using Apple’s subscription management flow
6. Does Setapp include the Muse iPad and iPhone apps too?
Yes! Muse on Mac, iPad, and iPhone are all supported through your Setapp subscription.
7. Does the Setapp subscription include more than Muse?
Your Setapp subscription includes Muse along with 240+ other apps. A single subscription gives you full access to every app in the Setapp library. Learn more at Setapp.com.
8. Why does a system permission alert appear when launching Muse?
When launching Muse on macOS Sequoia, the following prompt appears:
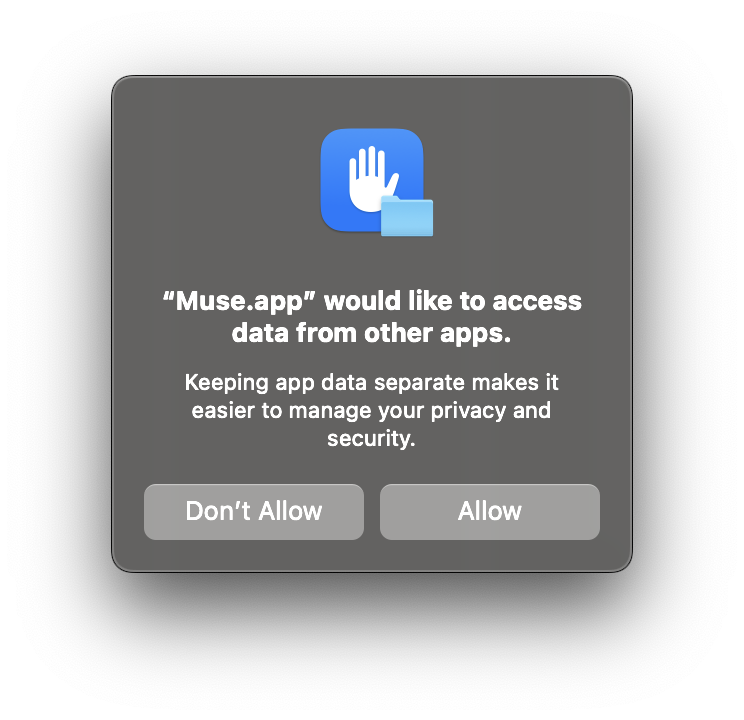
Muse shares data between the primary Muse app and the Muse Share Extension by using a shared “App Group” container. Apple changed their security model to show this prompt even when an application accesses data within its own “App Group.”
Muse does not access any non-Muse data on your system, this alert is only shown to allow Muse to access its own data within its own shared App Group.
You can read more about this issue in the Apple Developer Forums.
I have more questions, can I talk to someone?
Yes! If you have more questions, or any trouble at all using Muse for Setapp, you can reach Muse support at hello@museapp.com.